
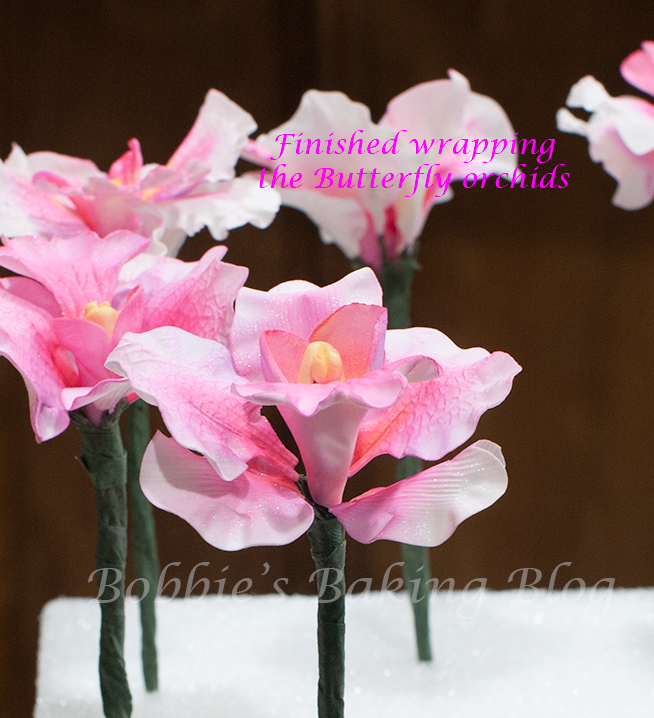
Almosts looks real, but the butterfly orchids are created out of sugar paste!
If you’re familiar with my blog you know each member of are little family unit has a birthday week; 2 weeks ago it was Sydney’s 20th birthday. She requested a very special cake decorated with gumpaste Butterfly Orchids; I was so excited to be creating this special “Sydney cake” with her. Butterfly Orchids have a very special place in her heart, and she wanted sugar paste butterfly orchids to adorn her cake (the cake will be continued on another post). I had ordered butterfly orchid cutters and veiners when the summer began, I thought I was prepared to teach her how to create these dainty flowers without a hitch. Time to laugh..I actually had created orchids before, but Moth Orchids. The Butterfly Orchid has a unique throat, one in which I actually put together upside down for the first five times. Sydney and I kept looking at the orchids knowing something was wrong, but could not put our fingers on it. Until I came across Sugar Orchids for Cakes, a must book for the avid cake designer and The Australian Orchid Genera, it finally clicked and we were then able to create the Butterfly Orchids.
The Butterfly Orchids:

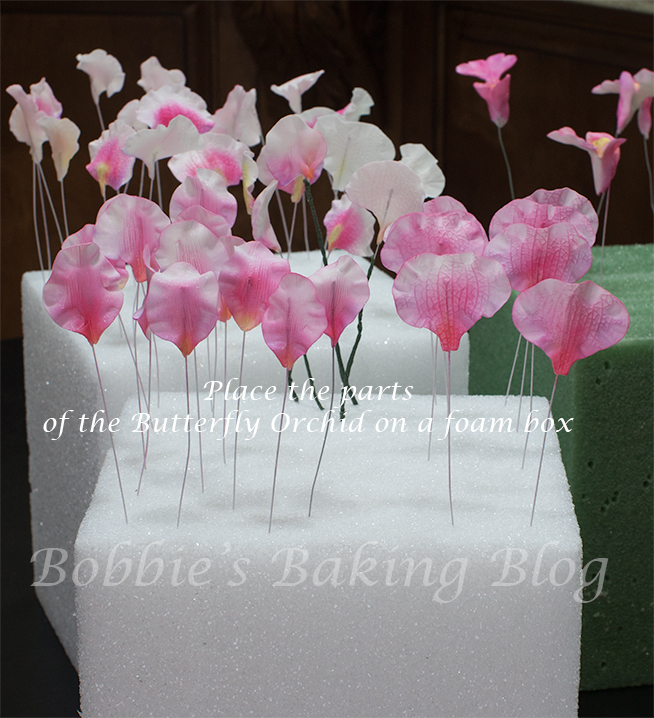
A sea of Butterfly Orchids
- Gumpaste, white
- Butterfly Orchid cutters
- Butterfly Orchid veiner
- Throat veiner
- Corn husk
- Ball tool
- Small frill stick (Celsticks)
- Foam pad
- Fondant roller
- 26 and 24 gauge wire silver & white color
- Floral tape
- Petal dust, color of your choice and an array of greens for the leaves
- Petal dust brushes
- Small sharp scissors
- A-ceto knife
- Triangle spatula
- Sandwich bag
- Cornstarch
- Crisco
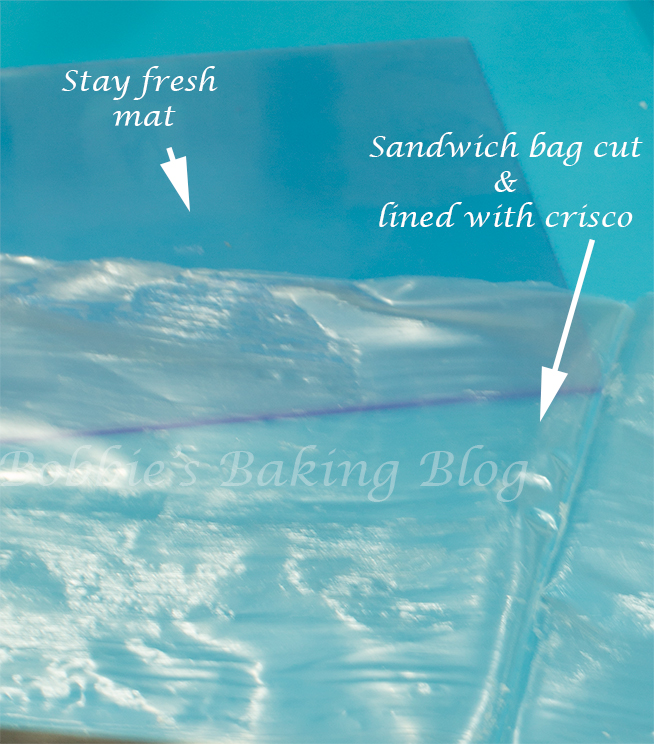
- Stay fresh mat
- Small needle nose pilars
- Confectioners glaze for the leaves
- Edible glue or egg white
- Florist foam
- Viva paper towel
Heads up we created 26 orchids, 15 buds, 13 leaves: in case of breakage. Also prepare the the Butterfly Orchids three days ahead of the cake.
Prepare your mise en place.

Sugar paste Butterfly Orchids mise en place
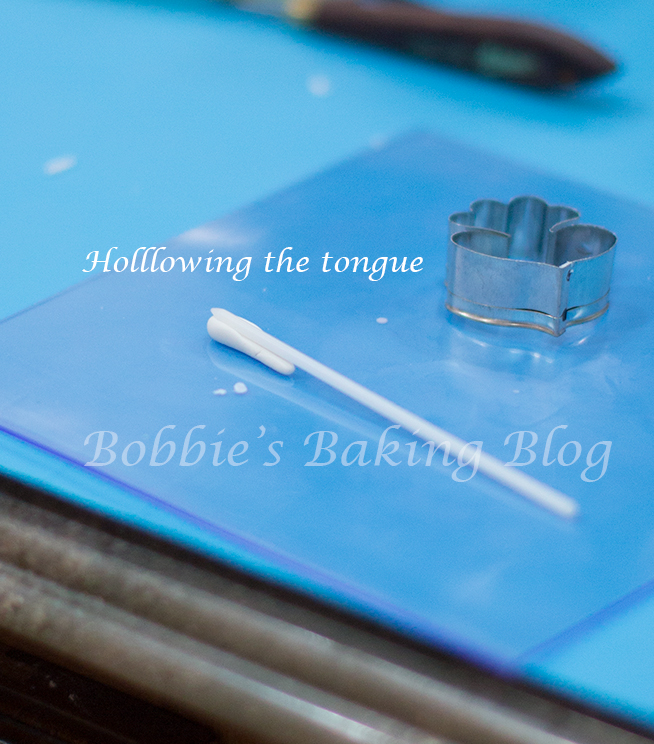
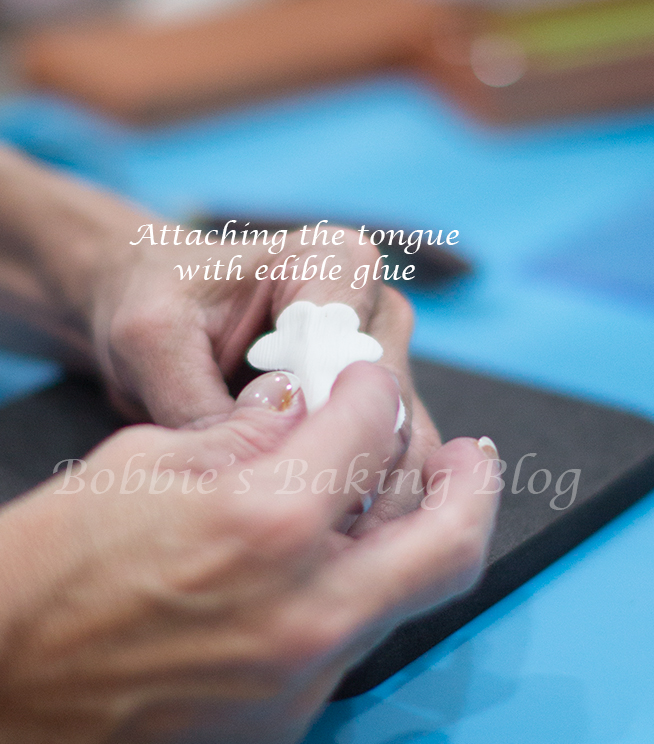
The column (I refer to this part as the tongue).
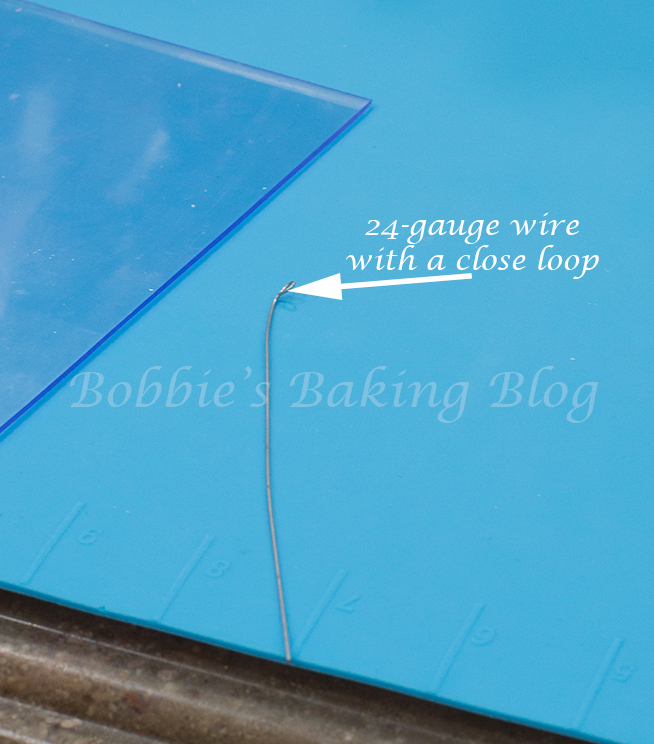
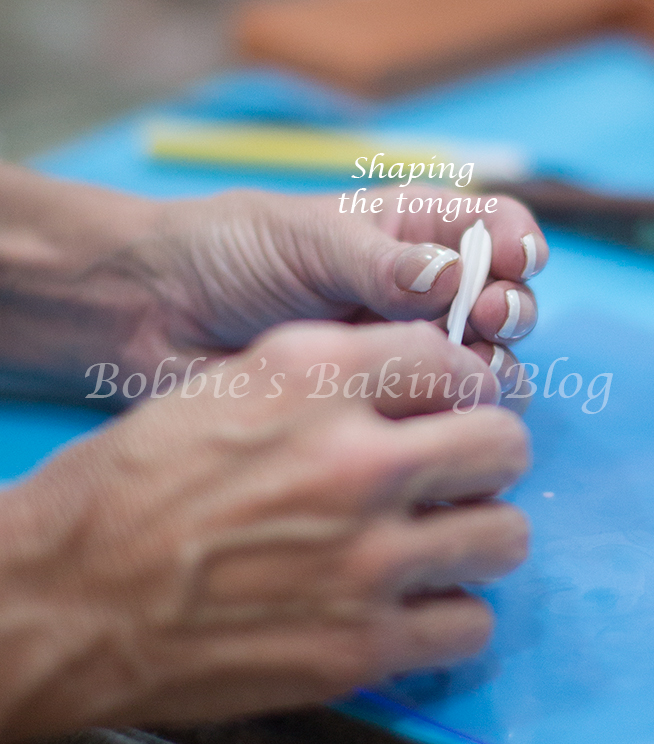
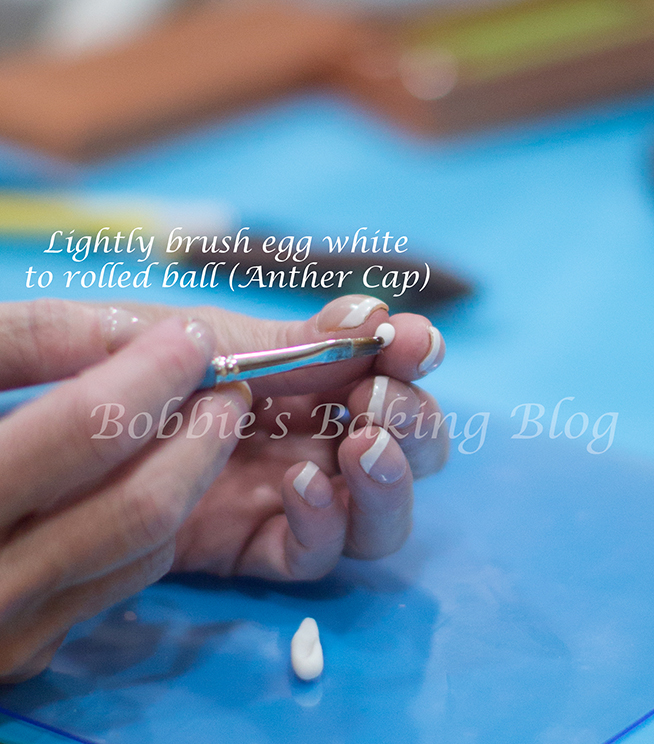
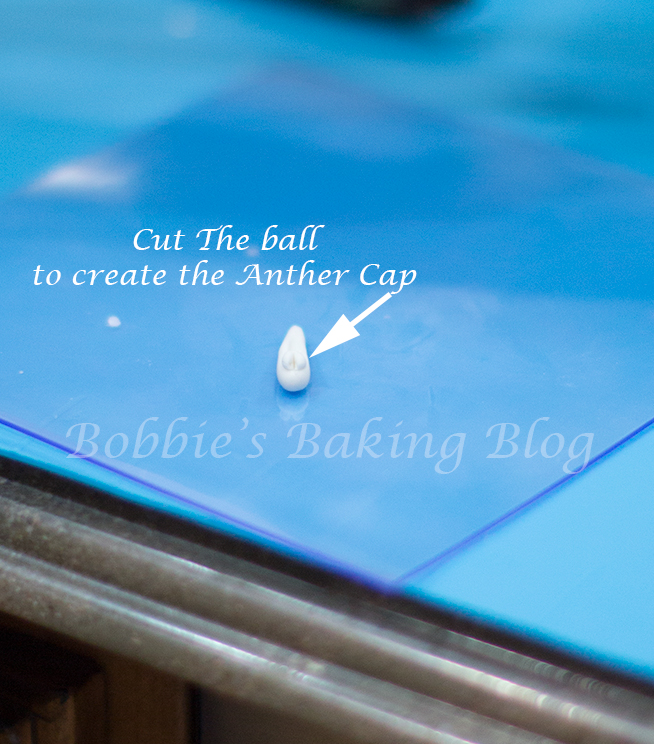
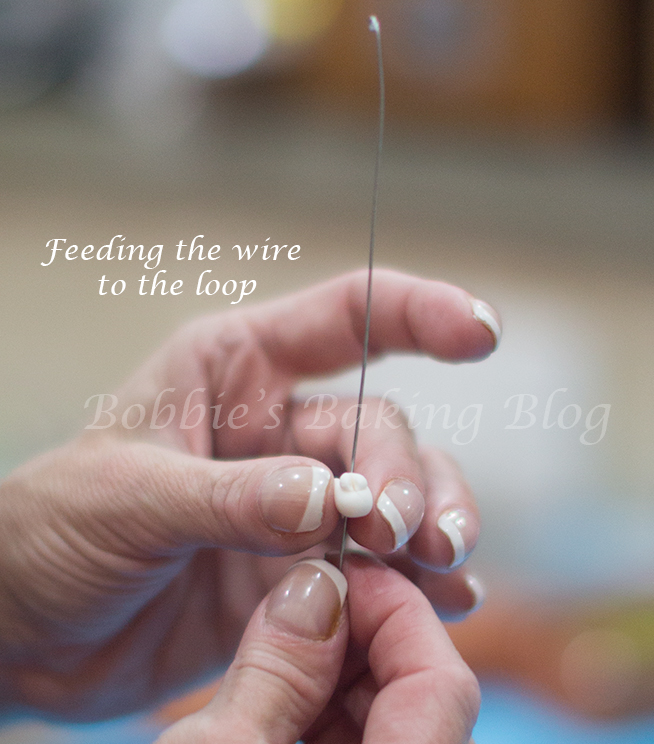
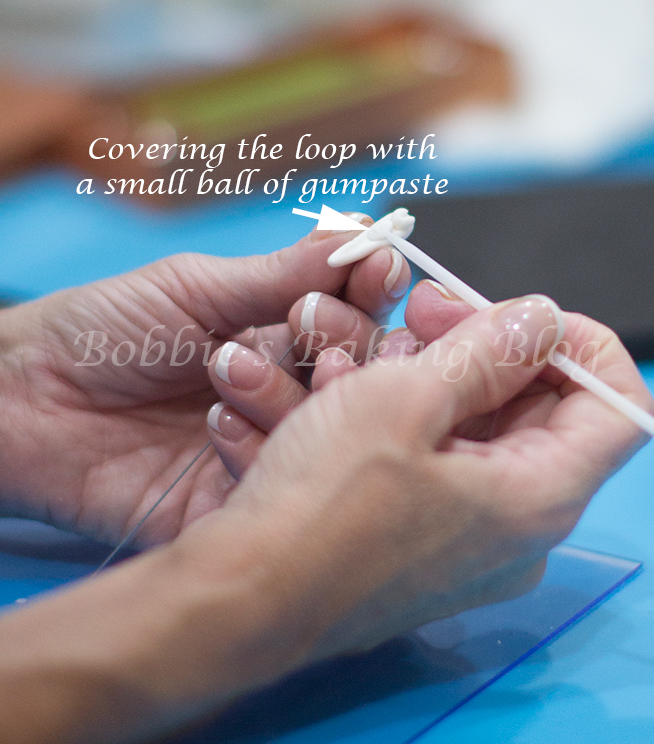
Prepare your 24-guage wire, loop one end with the needle nose pillars, set aside. Roll a large pea size piece of gumpaste into a ball, then a teardrop, the teardrop should be the length of the bottom of the throat to the two sides, with a celstick or a skinny orange wood stick hollow the teardrop while gently pinching the back of the column. Roll a teensy piece of gumpaste into a small ball, brush lightly with egg white or edible glue, attach to the wide end of the hollow column, with an a-ceto knife cut 1/4 in half to achieve the anther cap. Dip the prepare wire into the egg white or edible glue, push about 1/4 from the ball, curve the column slightly, cover the loop with a very teensy piece of gum paste, stick the wired column into a floral foam and begin the throat.
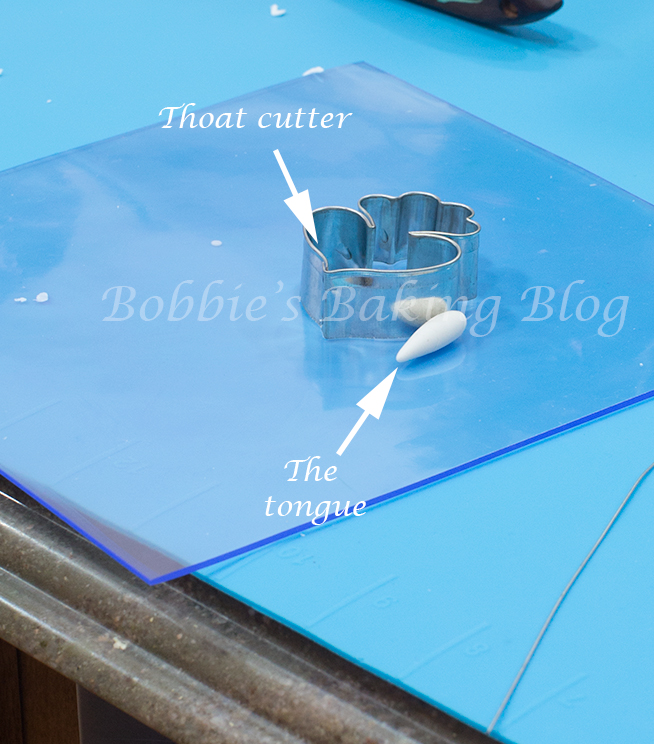
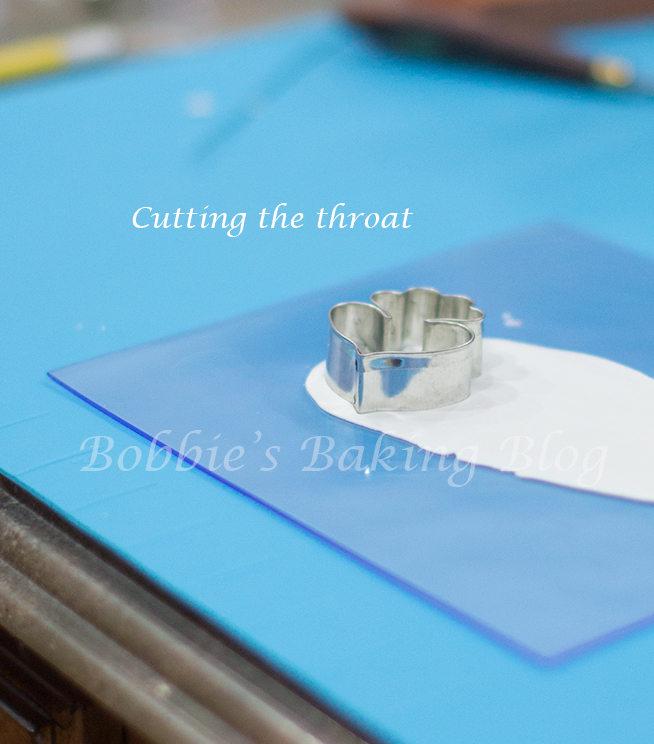
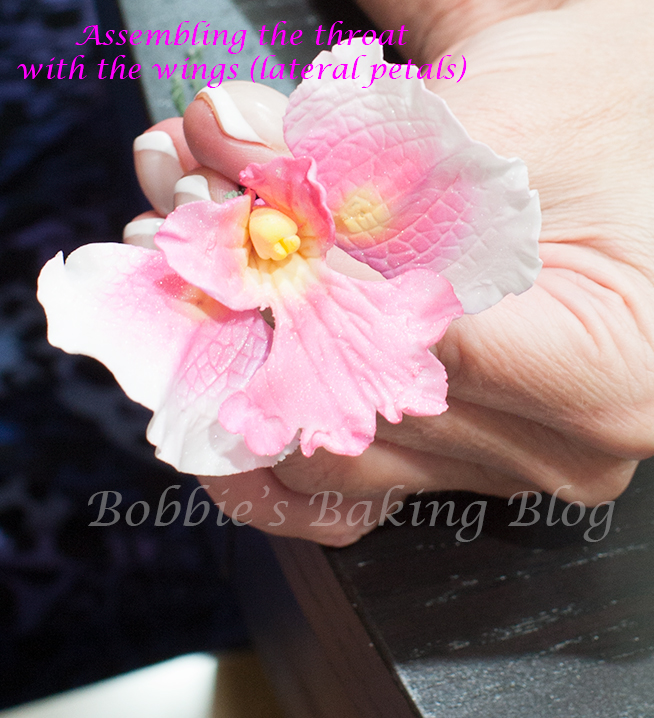
Time to create the Labellum (I refer to this part of the orchid as the throat).
Prepare a sandwich bag: cut the sides open, so the top lifts up, and rub a thin amount of Crisco on both sides of the bag, set aside.
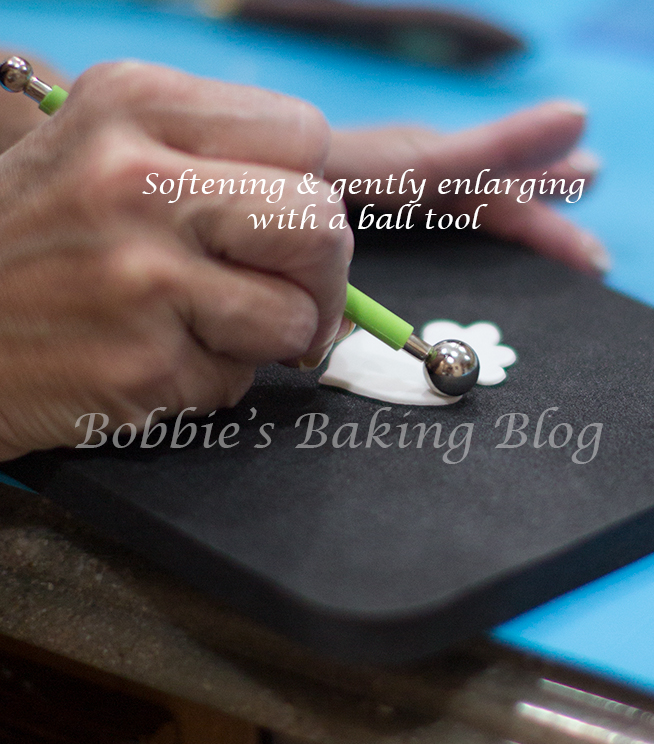
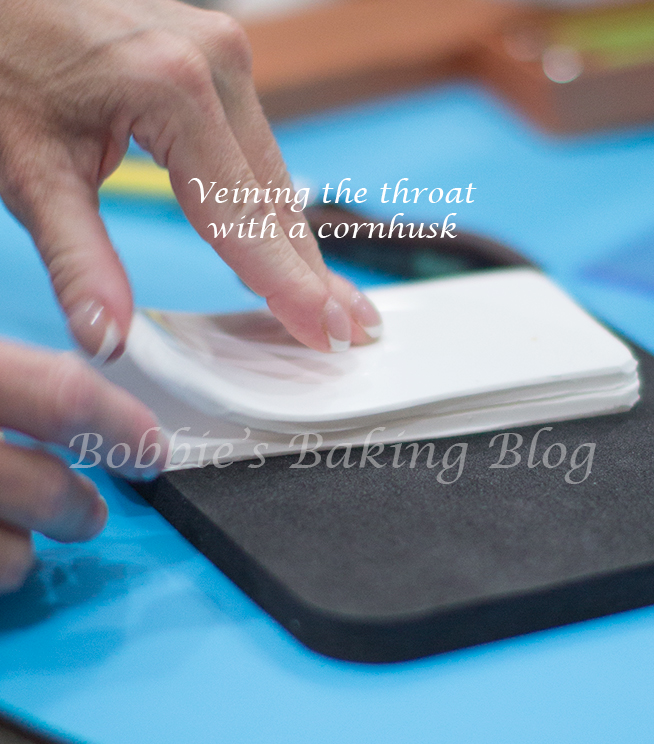
This particular step is most trying, but once it clicks you have it down! Knead a piece of gumpaste until the gumpaste becomes slight sticky and elastic, roll the gumpaste until transparent,(fairly thin), cut about four throats at on at a time with the throat cutter, and place the extra three in the prepared sandwich bag, cover with a stay fresh mat, if you have one. Gently enlarge and lightly frill the cut throat with a ball tool, by rolling the ball tool back and forth on the outer edge of the throat, lift the throat with a triangle spatula to either a corn husk or throat veiner and press the gumpaste in between the veiner. Lift the throat once again with the triangle spatula, place on your foam pad. With a celstick or cocktail stick, frill the throat, gingerly roll the celstick on the outer edge of the two sides and the four petals.
Attach the column to the throat with a light brushing of egg white or edible glue. Lay the column aligning the narrow end with the point of the throat and the anther caps facing down towards the body of the throat, bend the wire downward. Lift one of the two lobes and wrap loosely around the column and than wrap the other lobe, it should lap over the first lobe. I like to open my lobes and Sydney prefers the lobes to be just sightly open. Finish the next five throats, and breathe you have passed through the toughest phase! We laid the throats on a ceramic egg carrier with longest part on the flat centers, let dry for a few hours to over night.
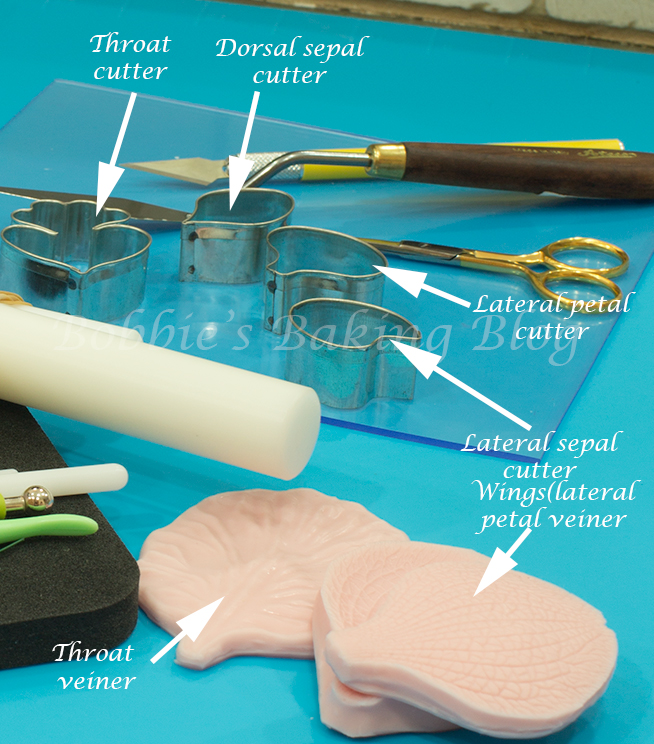

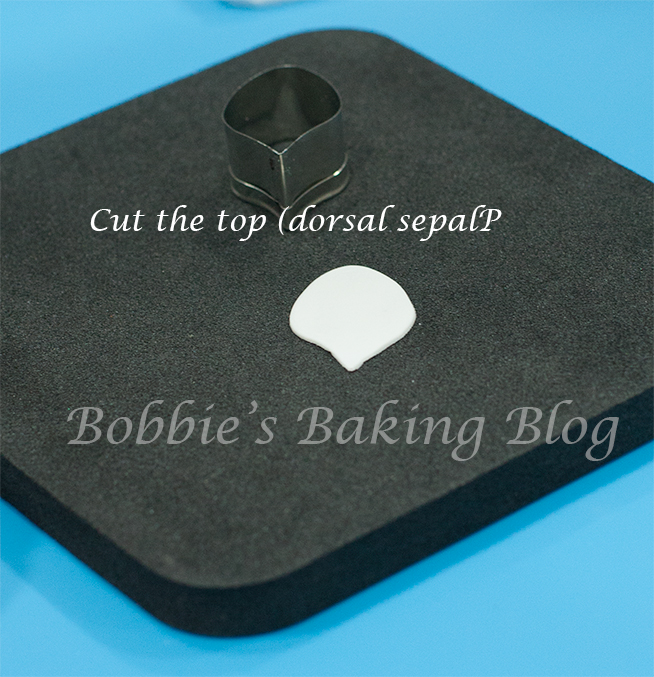
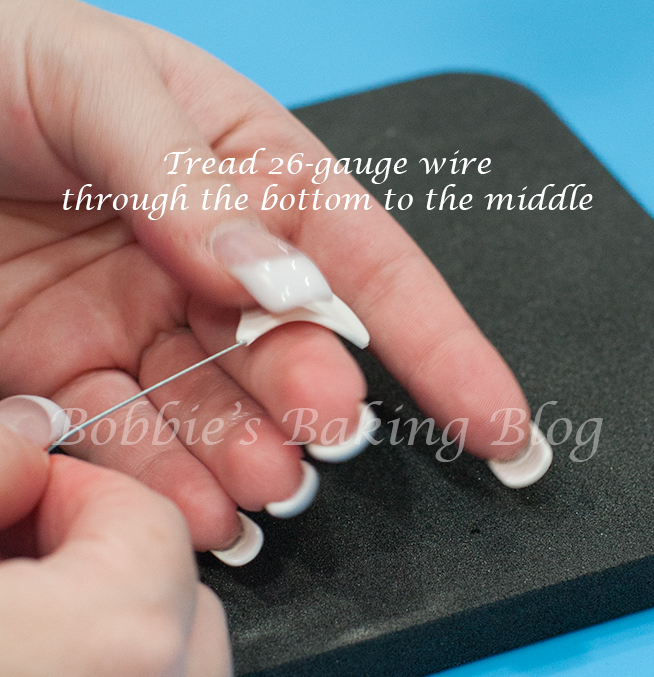
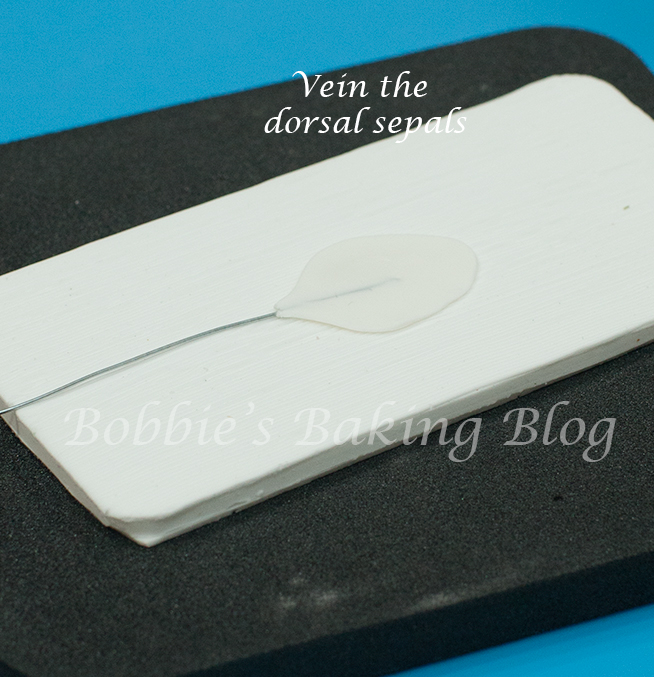
The dorsal and lateral sepals are created in the same manner.
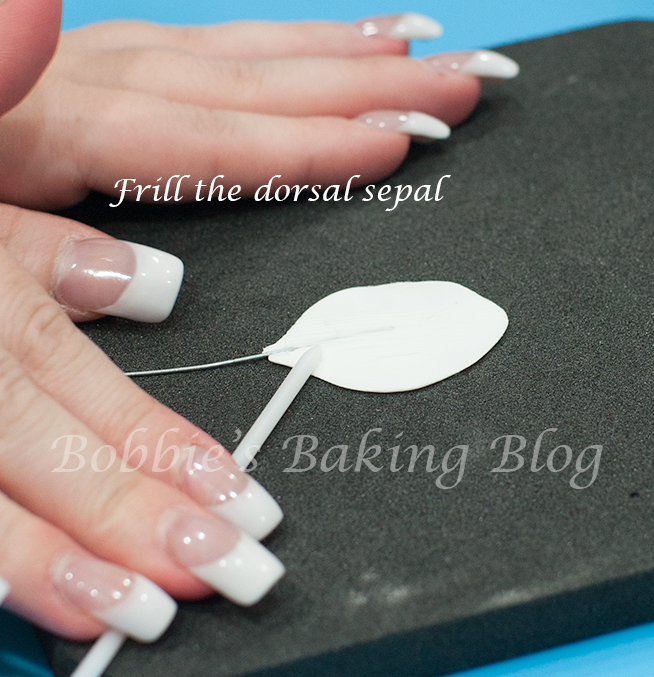
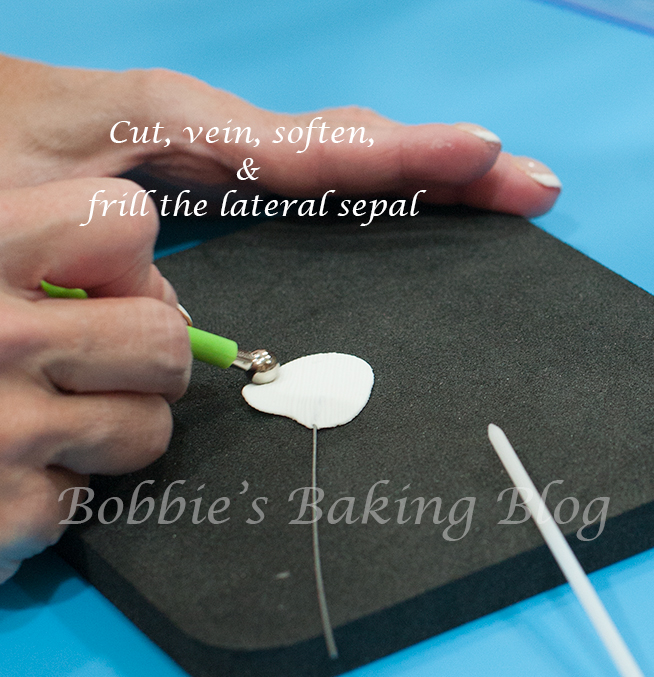
The lateral sepals have a comma shape were the dorsal sepal is more of a balloon with a bottom point. Knead and roll your gumpaste as you did for the throat, cut 2 dorsal sepals (you will need two for each orchid) and four lateral sepals, working with one sepal and placing the rest in you Crisco bag. Hold the sepal between your thumb and resting on your fingers, feed the 26 gauge wire through the bottom to the middle, take care to not poke through. Sydney finds it is easier to achieve this step with the sepal on the foam pad, (do whatever works for you)! Lay the wired sepal on the foam pad and lightly frill and enlarge with the ball tool. Working on the outer edge, place in the corn husk to vein, lift the sepal with the triangle spatula, place the sepal back onto the foam pad, and frill with the small celstick. To Dry with a nice curve place the sepal in a celpad or an egg crate with the wire in the celpad’s hole and place Viva paper towel to mold the sepals curve. (If you are using an egg carton poke a hole with a toothpick). Finish the rest of the sepals. Let dry for a few hours to over night.
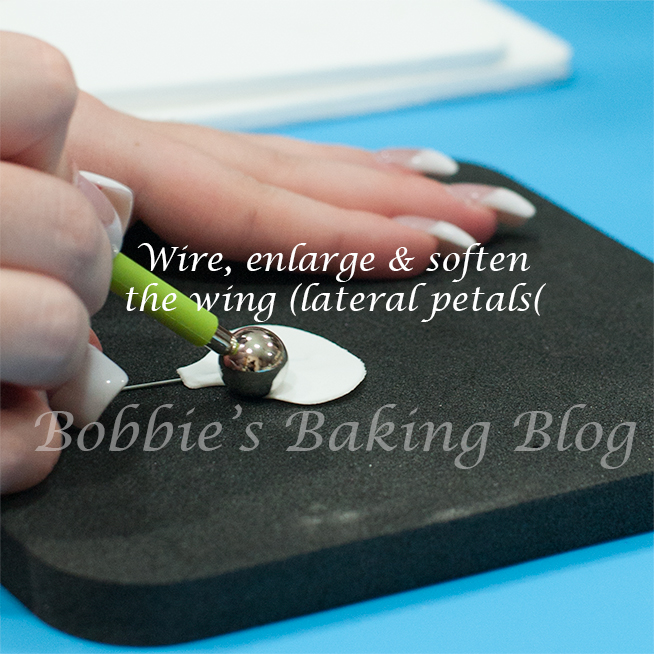
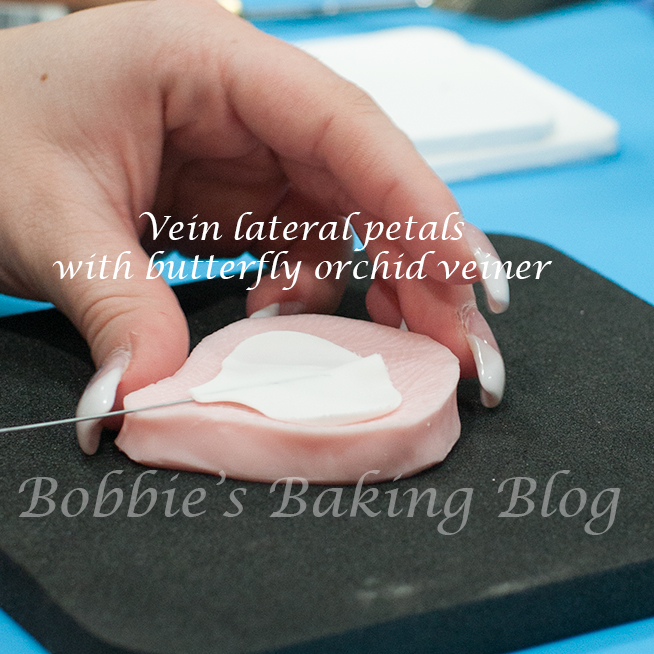
The lateral petals or wings as Sydney refers to them, due to the fact the petal resemble butterfly wings.
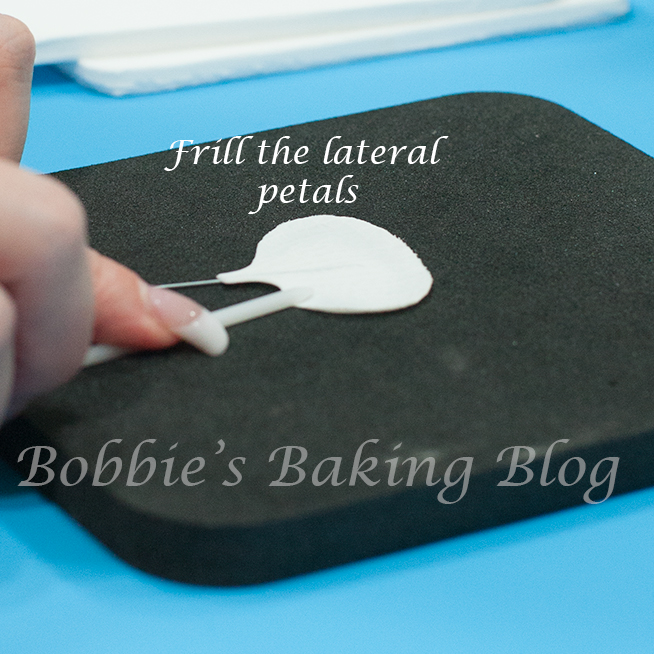
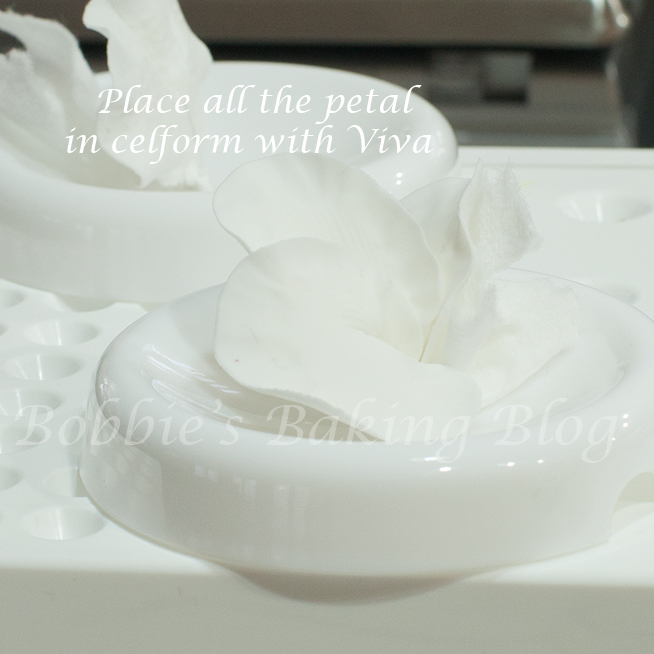
Prepare the gumpaste roll to transparent state and cut four lateral petals (you will need two for each orchid), placing the extra three in the Crisco bag. Thread the wire in the manner that works best for you, lightly ball with the ball tool, frilling, and enlarging, lift gingerly, and place in a lateral or wing veiner. Carefully transfer to a foam pad, using a celstick, frill with a back and forth motion. Lay the wing on a celpad and place the Viva paper towel to mold a curve while drying. Let dry for a few hours to overnight.
Coloring and assembling the Butterfly Orchid

Sydney lobes are more closed!
Prepare your mise en place.

Color & assembling mise en place
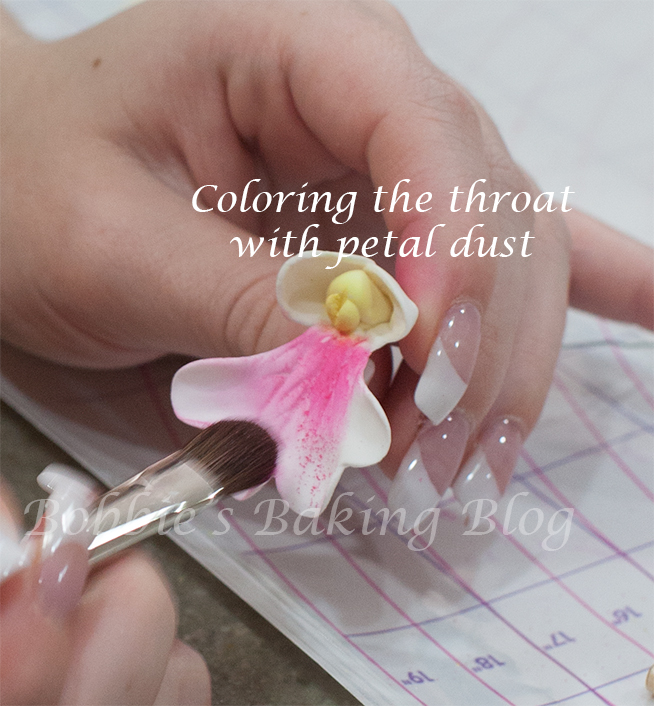
Decide what color you want your Butterfly Orchids to be, Sydney wanted her Butterfly Orchid Cake to match the special orchids from a memory, magenta and lemon yellow columns, with a tad of wedgewood purple. I find the colors to be very pigmented, so we mix them with cornstarc. There is a wonderful Craftsy video by Jacqueline Butler on hand crafted flowers dusting & glazing, Jacqueline goes into great detail in explaining Hydrangea flowers. The throat of the Butterfly Orchid has the deepest and richest color, to properly achieve a realistic color, layer the colors and dust with pearlized dust for a shine. The column and anther cap is yellow and should be done first with a small, but thick brush, the throat with a short haired thick brush, and to add a touch of purple or a hint of shade we achieve this with an angled brush on the edge of the petals and throat.
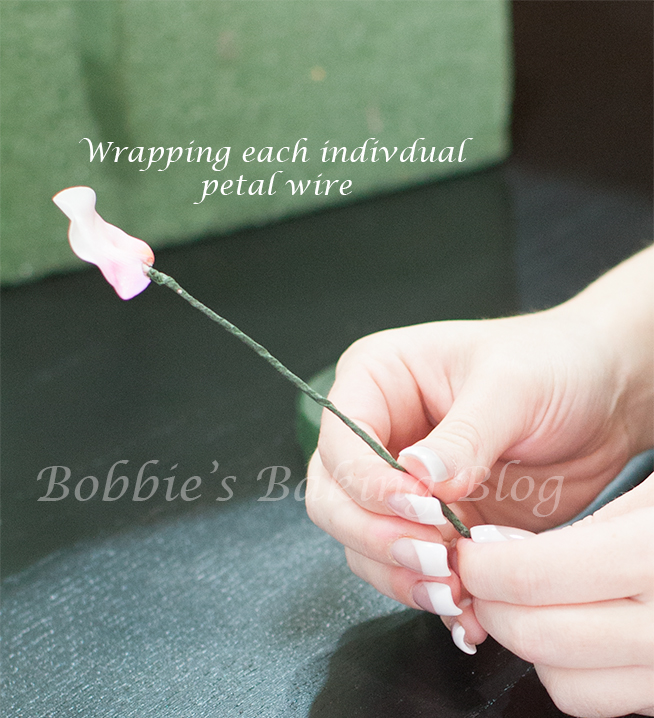
Wrap each individual wire with moss green floral tape, wrap tightly the throat and the two wings together first with the floral tape. Then add the dorsal sepal, and lateral sepals, and again tape them together tightly. The fastest and easiest way to wrap the wire is to stretch and pull the tape while gentle holding on to each petal. I find placing all the parts on a floral foam helps.

I can’t wait to share the whole cake, but Sydney and I felt the Orchids deserved their own post, being so involved! She is 20 I cannot believe how fast time flies, but that is another post.
Enjoy!

Voila!


wonderful tutorial! thank you for it
I am glad you’re enjoying it!