I must start off by saying this was one of the most entertaining cakes Sydney and I created; however if you had been with us in kitchen you would have thought you were part of a sitcom. Since the tulip paste and cake had been baked and assembled the previous night (which I would highly recommend) the decorations and glaze was all we had left to accomplish.
The first task we tackled was caramelizing the hazelnuts, which is not difficult, but messy and very hot. The method is to caramelize sugar and water allowing the temperature to cool down, dip hazelnuts that have been skewered and hung upside down. The last step is to let the hazelnuts harden. While in the processes of candying the hazelnuts my husband arrived home. He thought I had lost my mind.
He looked at Sydney and myself, shook his head and began to laugh. After trying to explain what the end result would/should be, he offered an practical idea of how to handle the hazelnuts. The cutting board technique, though easy to work with, was not “practical.” The next batch of nuts we tried DF’s idea; using a wire hanger and small bulldog clips that held the blunt end of the skewer, which worked perfectly. In fact the hanger technique produced a professional candied coated hazelnut. With either technique safety precaution needs to be in place. I would recommend a heavy canvas painting cloth for your kitchen floor, and water resistant painter cloth to cover your cabinets, draws, and appliances. I did not use gloves,(second comedy of errors) but I STRONGLY recommend them.
I had designed a special joconde tulip paste for the top layer, and I did not want to cover the design with chocolate. I did however want the cake to have a shiny clear surface, I used an apple pectin to achieve this extremely clear shiny glaze, without affecting the flavor of the cake. There is a product called pectin nh, which I actually prefer. When I went to grab the pectin nh ,however, I realized I did not have enough, I therefore substituted the pectin nh with apple pectin and the glaze was fine.
Fleur de lis shape was what we had choosen for the tulip paste, I did not have a stencil of one. Sydney had a marvelous idea,to design our own stencil. Using a sheet of acetate paper, a sharp food safe bladed knife, and a ruler. We were able to produce a fleur de lis stencil. (Acetate is dishwasher safe; so the stencil can be used a multitude of times).
I will admit we both, Sydney and myself, were a little apprehensive as to whether the joconde paste would work. Instead waiting the normally two hours in the freezer I left the fleur de lis pattern joconde to freeze for about four hours, in reality two hours would have been fine. When the paste was nicely chilled I removed the acetate sheet, carefully with a gentle hand covered the tulip paste with my hazelnut joconde batter, baked it in the oven for about 6 minutes.
Fleur di lis Gateaux:
This recipe makes three half sheet jelly roll pans, remembering one sheet will have your tulip paste with hazelnut joconde.
Prepare your mise en place and line 2 two half sheets with a silpat or parchment paper and set aside.
Chocolate Tulip Paste:
57 grams/ 1/2-cup icing sugar, sifted
57 grams/1/4 -cup butter, softened
50grams/ about 2 large egg Whites
35 grams / 1/3 c-upcake flour, sifted
22 grams/ 1/4-cup cocoa powder unsweetened
Cream the butter for about 1 minute in a standing mixer with the paddle attachment, then sift the icing sugar into the butter and cream until smooth (no lumps). Remove the bowl from the standing mixer whisk by hand with a balloon whisk the egg whites one at a time (if you put the egg white liquid in a measuring jug it easier to control), now add the flour in 2 batches and the cocoa powder. Continue whisking until a paste texture forms and all the color is evenly distributed.
With an offset spatula spread a thin even layer of paste, making sure to cover the entire silpat. Choose any pattern you like, either free hand the pattern on a silpat or find one from clipart, and using a food safe maker draw you pattern. Carefully and with precision cut the pattern with an “x-acto” knife, lay the acetate sheet that has now become a stencil on you prepared pan. Place the decorated Joconde paste in the freezer for about 2 to 4 hours.
Joconde:
247 grams/7 large egg whites, at room temperature
45 grams/ 3-tablespoons granulated sugar
338 grams/3 1/4-cups ground blanched hazelnut
338 grams/2 7/8-cups icing sugar, sifted
90 grams/4 large egg yolks
250 grams/7 eggs
117 grams/ 1 1/8cup cake flour
42-grams/ 3-Tablespoons clarified beurre noisette
42 grams/ 3-Tablespoons melted butter
Preheat the oven to 218ºC/ 425◦F. Line two 15½ by 12½ inch sheet pans (½ sheet jelly roll pans) with parchment paper and brush with melted butter.
Using a food processor fitted with a metal chopping blade, process the hazelnuts to a very fine cornmeal-like texture. In a bowl of your standing mixer with the paddle attachment, on low speed mix the hazelnut flour, icing sugar, and cake flour, just until combined. Increase the mixer to medium-low speed, beat 1 egg at a time making sure each egg is beaten for a couple minutes, occasionally scraping down the sides of the bowl. It is imperative that each egg is added and beaten for a couple of minutes. Once all six eggs are incorporated continue to beat, on medium speed for 4 minutes insuring that as much air as possible has been incorporated. The mixture should be pale yellow in color and voluminous. Set the batter aside, or if you do not have another mixer bowl scrape the batter into a different bowl.
In a very clean bowl of your standing mixer fitted with the whisk attachment beat the egg whites and egg white powder on medium speed to aerate. When the egg whites begin to form soft peaks slowly add the granulated sugar and whisk until the peaks are stiff and glossy. Keep a careful eye on the egg whites they can very quickly turn from satin shiny glossy peaks to gloomy dry and an over mixed nightmare. (If this happens don’t panic, however you will need to repeat the process with six more egg whites).
Using a rubber spatula, gently fold the meringue into the hazelnut mixture, in two batches. Take about ½ cup of the batter and fold into the melted butter, this method keeps the butter from falling to the bottom of the bowl, and then fold the melted butter back into the batter (making sure it is completely incorporated into the batter).
Remove the Joconde paste from the freezer. Carefully pour 1/3 of the batter on the Joconde paste and the 2/3 divide equally between the 2 half prepared jellyroll pans, smoothing it into an even layer. DO NOT press down or the batter will loose volume and the cake will be tough. Bake the cake layers until they are lightly browned and just springy to the touch, about 5 to 8 minutes (every oven is different so keep a close eye on it).
Remove from the oven and invert the cake onto a cool sheet pan or a wire rack, peel off the parchment paper and cool completely. One of the cakes will have the pattern embedded on it.
Frangelico Hazelnut Syrup:
119 grams/ 1/3 -cup water
100 grams/ ½ -cup sugar
69 grams/¼-cup frangelico or hazelnut liquer
Bring the sugar and water to a boil in a heavy bottom saucepan; cook till the sugar is dissolved. Pour the syrup into a glass-measuring jug and add the Framboise when the syrup has cooled. Brush every other layer of the cake with the Frangelico syrup.
For the Strawberry syrup:
Look at Le Gâteau pour les Amateurs: The Cake of Love.
For the Strawberry Coulis Jellified:
Look at Le Gâteau pour les Amateurs: The Cake of Love also.
White Chocolate Crème Anglaise:
560 grams/ 2 1/3 cup half & half
170 grams/ ¾ -cup Mascarpone Cheese
168/6-7 egg yolk
170 grams super fine sugar
Pinch of salt
2 ½ -teaspoon Fragoli
46 grams powder sugar
1 vanilla bean,
20 grams/7 sheets gelatin, gold strength (L’ epicerie)
440 grams heavy cream, cold
225 gram white chocolate, melted and cooled
Place the bowl of a standing mixer along with the whisk attachment in the freezer ½ hour before preparing the filling.
Heat mascarpone half and half, and a vanilla bean in a heavy-bottom saucepan bring to a ”kiss” of a simmer.
While the crème mixture is heating place the gelatin sheets into very cold water, and with a hand mixer beat egg yolks and sugar, in a bowl, preferably copper, till ribbons form and the egg mixture turns pale yellow.
In a steady stream, pour ½ of the hot crème over egg mixture, stirring with the whisk continuously. (Do not beat to minimizing foaming). Be sure to scrape the yolks from the sides and bottom of the bowl and stir until thoroughly blended. Pour the egg crème mixture back into the pan. Using a wooden spoon in place of the whisk, stir continuously until you can see clearing the sides and bottom of the pan. As the sauce heats do not let it boil when it becomes thick test the mixture: when it coats the spoon well, a trail will remain when you draw your finger across it, and registers 74 degreesC/165 degrees F. Immediately remove from the heat and pour the sauce through a sieve into a bowl set and allow to cool. Stir in the gelatin sheets (after ringing out the excesses water), fragoli, and add vanilla seed from the pod (that is left in the sieve).
While the Crème Anglaise is cooling whip the heavy cream and powder sugar to soft peaks in a standing mixer with the whisk attachment on medium speed. Turn mixer down to low and slowly pour white chocolate and the Crème Anglaise into the whipped cream. Spread the mousse on a jelly roll pan and place in the refrigerator for two hours. When ready to assemble cut circle the same size as the the bisciut.
Neutral Glaze: adapted from Pierre Herme**:
478 grams/ 2-cups water
200 grams sugar
1 lemon rind
2 vanilla pod
20 grams/ 2-tablespoon pectin nh or apple pectin
20 grams lemon juice, about 1/2 of a whole lemon
In a heavy bottom pot place the water, lemon peel, and vanilla pod heat to 45 degrees C/113 degrees F. Then add the sugar and the pectin and bring to a boil for about 3 minutes. Remove from heat and add the lemon juice, allow to infuse for at least 30 minutes. Pour through a fine mesh sieve. The glaze may be stored in the refrigerator.
** This a very loose adaptation of Pierre Hermes Translucent Glaze, but the effect is wonderful.
Assembly:
You will need 4- 4x 3 cake rings lined about 1 inch higher with parchment paper.
Take the Strawberry Coulis Gelatine from the freezer and cut circles the same size as the biscuit.
Using a sharp knife cut four circles with 4 inch diameters of the Joconde cake, place one of the circles (the patterned sponge) in the bottom of a prepared cake ring. Using a pastry brush, generously soak the cake with the Frangelico syrup alternating layers with Fragoli syrup,
Place a circle
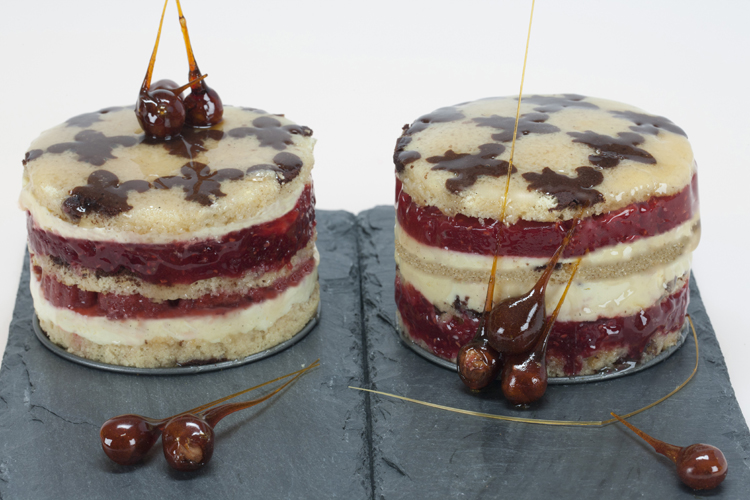
white chocolate crème anglaise circle over the biscuit circle, place a circle of strawberry coulis gelatine, layer with another Joconde biscuit, generously brush framboise syrup, spread créme fraiche, place a circle of raspberry gelatine. Continue this method till there are four layers ending with a Joconde tulip biscuit (so the fleur de lis design is facing up). With a ladle cover the gateaux with the neutral glaze.
Place the gateux/cakes in the freeze for a few hour to overnight.
While the gateaux/cake are still in the freezer prepare the candied hazelnuts.
Candied Hazelnuts:
9 whole roasted and skinned hazelnuts
200 grams/ 1-cup sugar
59 grams/ 1/4 cup water
1/4 teaspoon vanilla
Carefully skewer one hazelnut on the tip of a long wooden skewer, and prepare a wire hanger with small bulldog clips over the hanger; set aside.
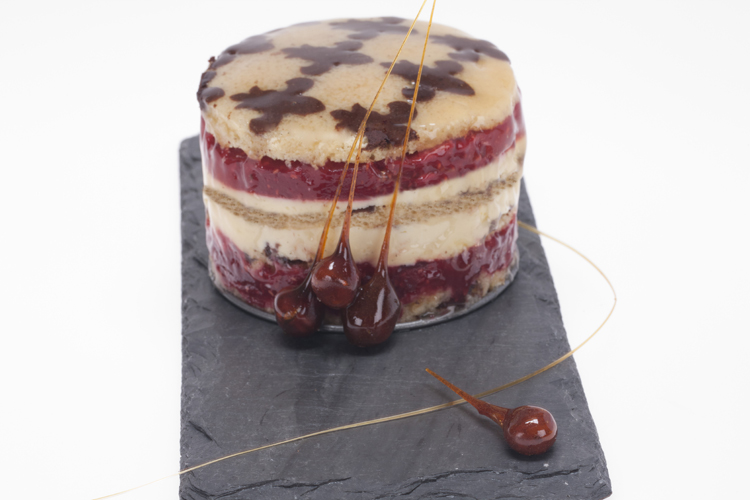
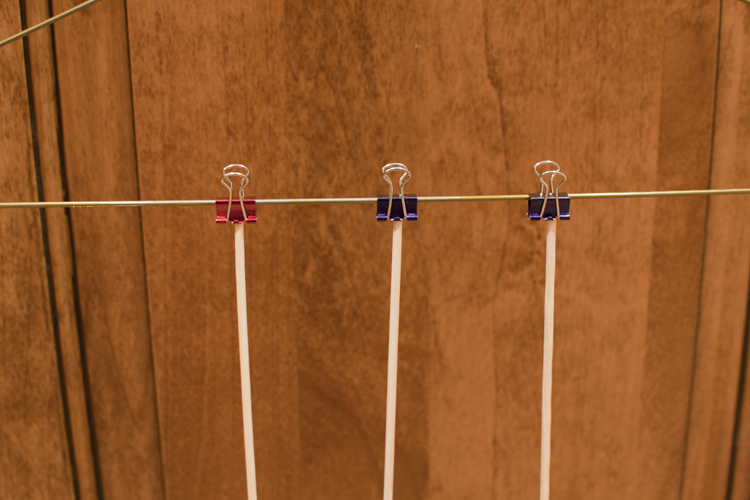 In case my articulation is confusing so here is a picture!
In a heavy bottom saucepan add water and sugar over medium heat, swirling occasionally, until sugar has dissolved. Continue to cook until syrup comes to a boil, washing down the sides of the pan with a wet brush to prevent crystals from forming. Allow to boil until syrup turns light amber, about 5-7 minutes; remove from heat. Let stand until slightly cooled, 8 to 10 minutes.
Take 1 skewered hazelnut and dip it into syrup, coating completely and letting excess syrup drip back into pan. When dripping syrup becomes a thin string, secure the blunt end of skewer on the bulldog clip on the hanger, hang the hanger on the edge of your working counter, letting caramel string drip down to covered floor (describe above). Repeat with remaining hazelnuts. Let stand until caramel hardens. Carefully remove skewers and decorate the cake. This also makes wonderful gifts as is.
Now this method leads to the next comedy of errors. At this point I asked DF to bring the cakes from the freezer into the house. DF seemed to be taking a very long time bringing in the cakes, the refrigerator I use for pastries is in the garage. So I sent Sydney to check on him, they both arrived back into the kitchen without the cakes/gateaux. DF looked as if he had just broken a vase and was in fear of punishment, with a whispering voice he explained something horrid had happen to my cakes. I, as calmly as I could asked him if he had dropped them. He replied “no,” the tops had turned white, laughing I explained the opaqueness would become clear and shiny when the neutral glazed warmed up a bit.
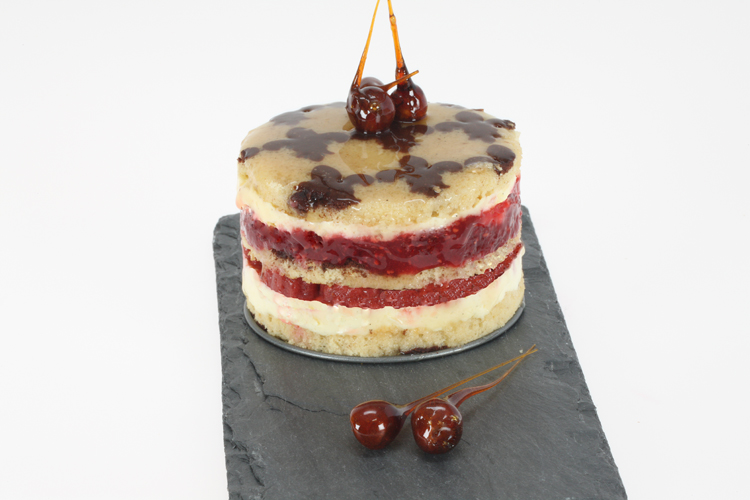 The Neutral glaze is so shiny it is reflecting the hazelnuts!
Hey don’t forget to look at 3-d photo gallery!

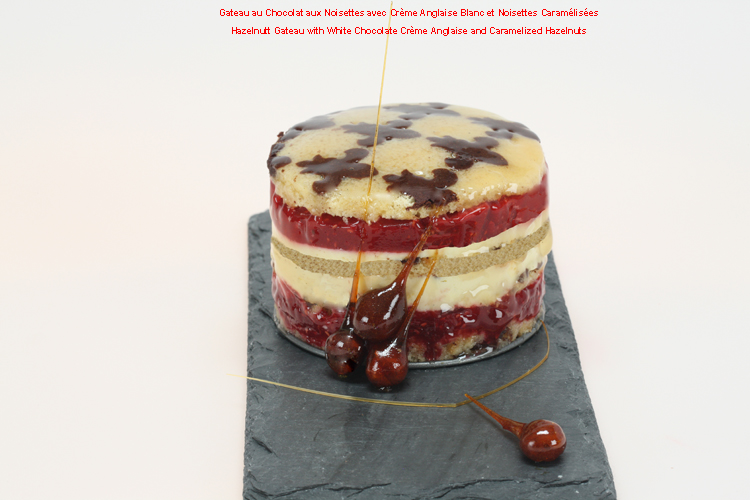

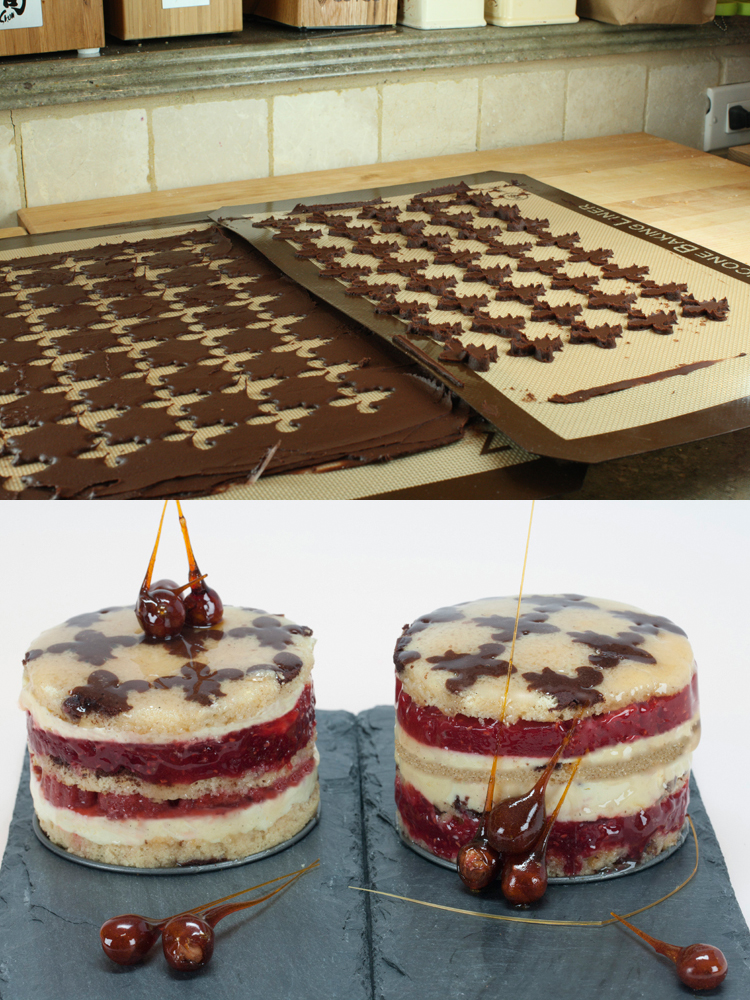



I’ve just discovered your site. It’s fabulous, but I may be biased because j’adore anything and everything that’s French. This dessert is to die for and your photos look good enough to eat. Takes me right back to France and their gorgeous Patisserie shops. I’ll be back for more.
You make blogging look like a walk in the park! I’ve been trying to blog daily but I just cant find writing material.. you’re an inspiration to me and i’m sure many others!
Great read, I was needing details on this the same thing.
Very nice post. Info given is properly elaborated. Thanks for sharing.
Why has it taken me so long to arrive at this site. You’re amazing so detailed and the information is easy to understand. I quite impressed with the candy hazelnuts.
Wow! Fantastic job! It is truly beautiful.
That is one hell of a cake, the hazelnuts are over the top. Great tip on hanging the skewers!
What an outstanding cake, there is something extraordinary about it. It just catches my eyes
Hiya there – I could declare, impressed with your site. I had no hassle navigating manner of all of the tabs in addition to related data had been outstandingly simple to do to access. I came across what I deliberate to instantly by any means. Much nice. Probably would recognize it must you add consumer dialogue forums or one thing like that, could also a really great way to your clients to socialize. Professional job..
Hello there! I really enjoy reading your blog! If you keep making amazing posts like this I will come back every day to keep reading.
All I can say is YUM!!!
Hey I found your blog on Google It made me think about a number of things so I checked out some of the links. I hate to admit; I was blown away, man you can write!
I hope you have a good day! See you soon.
Gâteaux superbes, l’amour les noisettes
If I had just one of those cakes I would be scraping the fork with my teeth to get the last tiniest bite.
my husband took a look at the screen as he walked by and couldn’t believe his eyes. i couldn’t either, which is why i was just sitting there staring at the screen. of course the poinsettia is absolutely amazing, but the cake itself is a work of art. so beautiful. thank you for sharing your success.
This weblog seems to recieve a good ammount of visitors. How do you advertise it? It gives a nice individual twist on things. I guess having something authentic or substantial to give info on is the most important thing. Btw the cake looks yummy!
Verry good informations! I have grabbed your feed.
Wow! Not just one beautiful cake, but two! Your decorations and photographs are inspiring.
Good day! I simply would like to give an enormous thumbs up for the good information you have got here on this post. I will be coming again to your blog for more soon.
that cake looks gorgeous!
When I open up your RSS feed it throws up a bunch of weird text, is the malfunction on my side?
hi I am wondering if I can use this post in one of my blogs if I link back to you? Thanks
I believe so
Great piece. I was checking continuously this blog and I am impressed! Extremely helpful info specially the first part. I care for such information much. I was seeking this particular information for a long time. Thank you and good luck.
What’s not to love, it’s stunningly gorgeous. Your a true professional in the pastry field.
Gorgeous! I love the fleur de lis and candy hazelnuts. Great job!
Beautiful cake! I love the way you decorate!
very good publish, i definitely love this website, keep on itIt’s arduous to seek out educated individuals on this subject, however you sound like you already know what you’re talking about! Thanks
Wow! That looks like a delicious artery clogging chocolate extravaganza, I could really go for a piece… or two.
Nice article. I was checking continuously this blog and I am impressed! Extremely helpful information specially the first part. I care for such info much. I was seeking this certain info for a long time. Thank you and good luck.
Kudos for posting such a useful weblog. Your weblog is not only informative and also looks good too. There usually are very few people who can write not so simple articles in a creative way. Keep up the good work !!
Wow!! That cake is amazing!! I love hazelnut and this one is gorgeous too!!
WONDERFUL Post.thanks for share..extra wait .. …
Kudos for posting such a useful weblog. Your weblog is not only informative and also artistic too. There usually are very few people who can write not so simple articles in a creative way. Keep up the good writing !!
That cake looks amazing! I adore hazelnuts!!
OMG, that dessert is fantastic! What elegant flavors! Simply define!
Your cakes look incredible! I adore the hazelnuts!
Thank you very much for this info. Waiting for next one.
Sounds amazing. Where do you find hazelnut flour at? Somehow I think my grocery store won’t have it.
Amazing piece. I was checking constantly this blog and I’m impressed! Very useful information specifically the last part on an easier way to hang the hazelnuts. I care for such information much. I was looking for this particular information for a very long time. Thank you and good luck.
you’ve explained it very well. I’ve wanted to make this cake for years but thought it was too hard! After reading your post I’ll give it a try. Thank you.
What a delightful dessert. I love the white chocolate crème anglais. Beautifully done!
This recipe sounds wonderful.
I like the valuable info you provide in your articles. I will bookmark your weblog and check again here regularly. I am quite sure I will learn plenty of new stuff right here! Best of luck for the next!
wow very mouth watering, makes me want to dive right into the screen….glad you added the candied hazelnuts 🙂
I am just in awe of this jocund with hazelnuts. It is just stunning. Bravo!
This cake looks beyond amazing! I’m loving everything about it!
Keep the faith, my Internet friend. You are a first-class writer and deserve to be heard.
Gorgeous, after looking at all the other jocund you made, I am not surprised! Your work is beautiful!