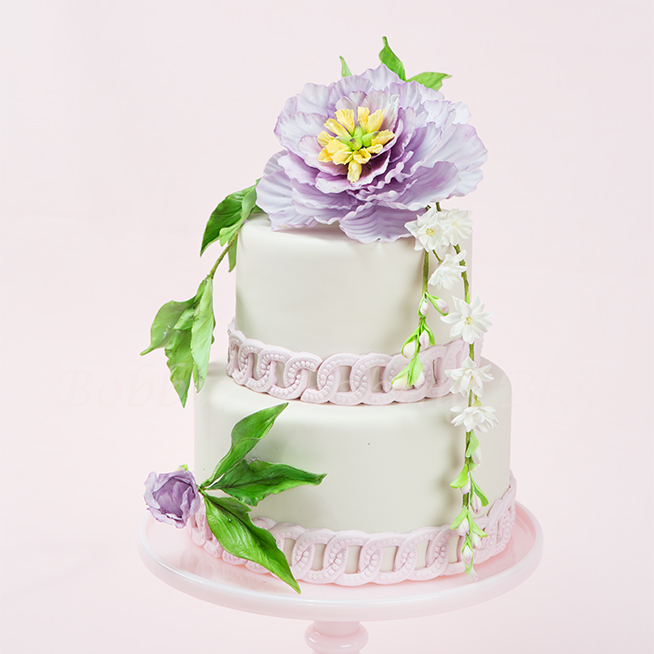
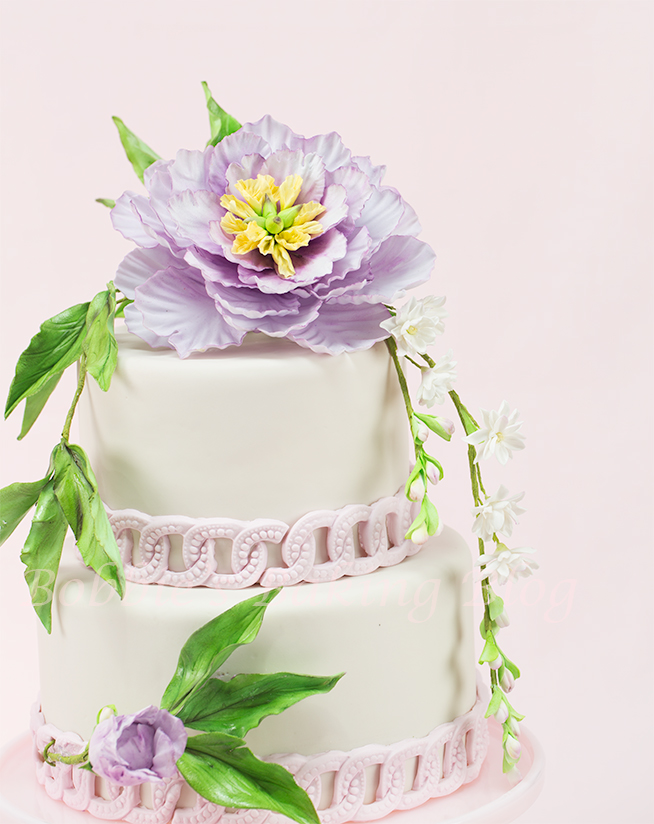
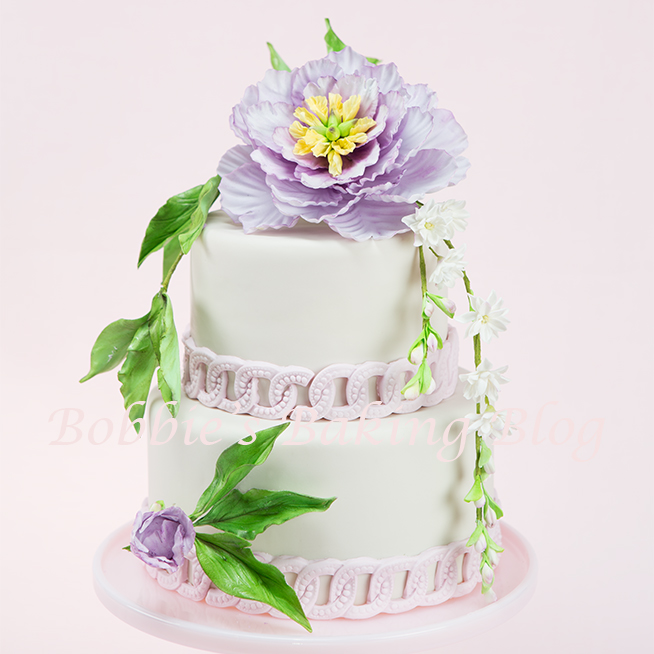
A Peony Spray Cake topper!
Peonies are one of my favorite flowers, we have had them adorn our landscaping for almost 22 years; I remember planting our first peony plant with Sydney (she was almost two) and it just happened to be Mother’s Day. As I was covering the the second cake Sydney came through the door ready for 10 days of fun (she is spending the summer in DC). I had originally created the Peony cake topper as another cake, in a long line, of 21 birthday cakes for her to choose from. The Peony symbolizes friendship, good luck, feminine beauty, elegance and poise, all the qualities Sydney has acquired.
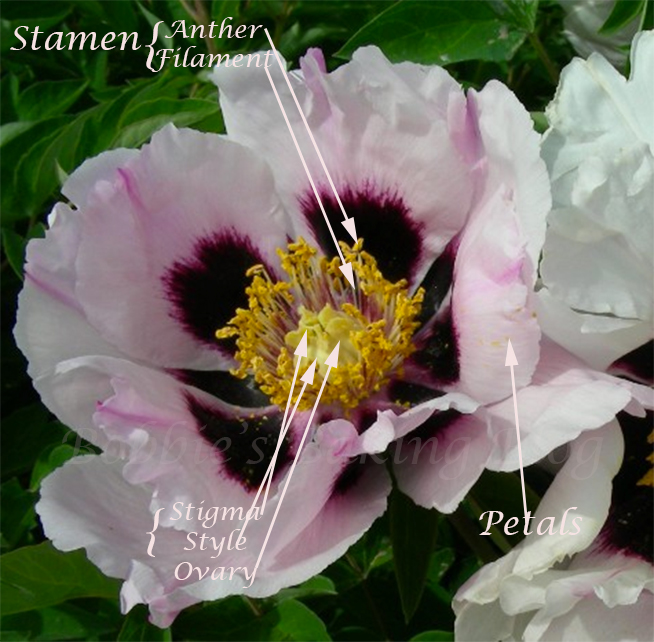
For the past few years the Peony has become one of the favored flowers for brides, on their cake, in there bouquets, and apart of table arrangements. In Europe, the peony is also referred as “the rose without thorns.” The cultivation of peonies in France has captured the flowers’ fragrant essence into perfumes. They bloom in June, also a popular month for brides to choose for there wedding dates, and each year the plant gains in foliage. Generally they are pink or white in color, but we had the most delicate purple and white plant in our first yard. The aroma is intoxicating as is the beauty of the flower. Peonies are said to hold your secrets in their tightly bond petals, regardless they mesmerize you with their majestic elegance.
I based my peony off this plant.
Peony Spray:
I am having a blast creating these cakes for Sydney to choose from!
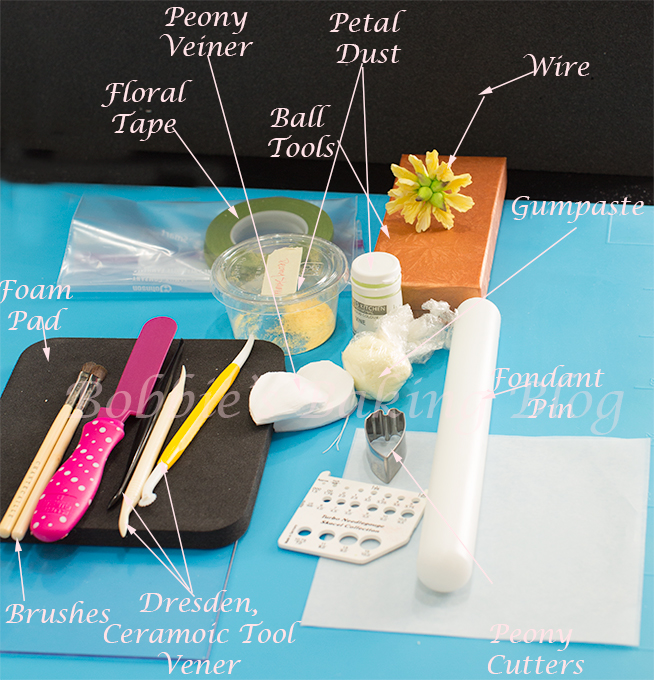
Equipment:
- Grove board, CC
- Ceramic veining tool, HH
- Peony petal veiner, SKGI or JR
- Peony leaf veiner, SKGI
- Dresden Tool, FMM
- Peony Cutter, CP
- Fine scissors, embroidery
- Ball tool
- Plain cutting wheel, PME
- 50mm Blossom cutter, OP
- Medium CElstick
- Steamer, ISAC,optional
- Nile green wire, 28 gauge
- White wire, 24 gauge, 26 gauge, & 18 gauge for the peony bud
- Nile green floral tape
- Artist Brushes
- Cosmetic sponge
- Foam pad
- Madeline pan, for laying the petals, or an egg former
- Paper towel
- Parchment paper
- Needle nose pliers
- Floral Foam
- Pasta machine, optional
- Heavy plastic mat
- Green cutting mat,NL
Materials:
- Gumpaste/ sugar paste
- Food paste, electric purple, electric pink, regal purple
- Petal dust:
- Aubergine, CC
- Vine, SKGI
- Foliage, CC
- Edelweiss, SKGI
- Daffodil mixed with magnolia, CC
- Violet, CK
- African Violet, CK
- Rose pink, CK
- Gumpaste
- Edible glue
- Egg white
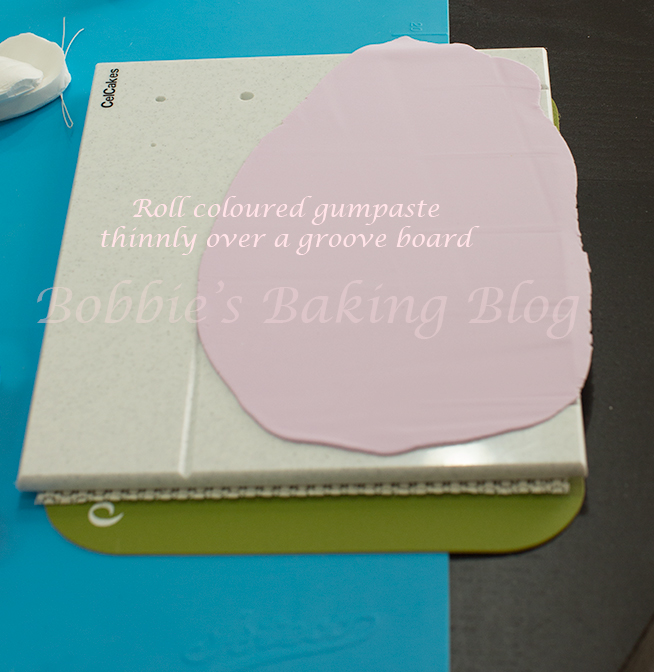
Color your gumpaste, you will need light yellow for the ovary and stamens, light green for the leaves, and for the peony petal I mixed 1/2 toothpick of electric purple, 1/8 toothpick electric pink, 1/8 toothpick regal purple.
Prepare your mise en place.
Stamen mise en place
Ovary and Stamens:
You will need to create your ovary and Stamens first.
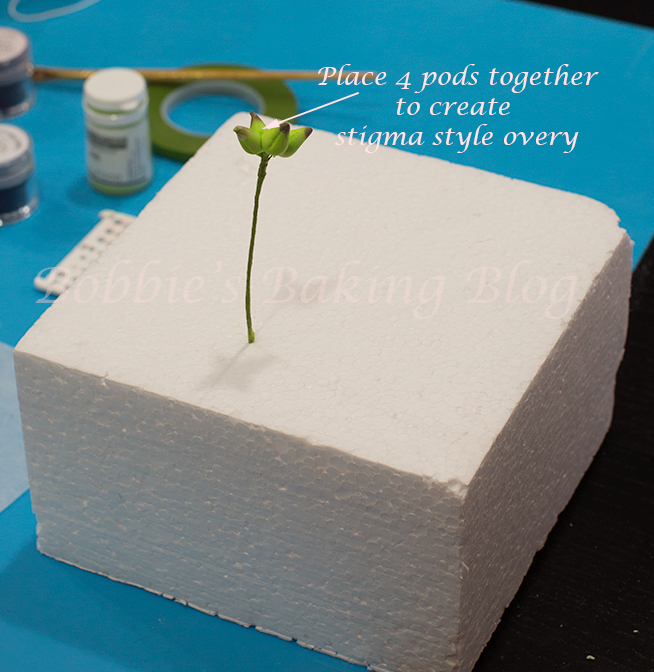
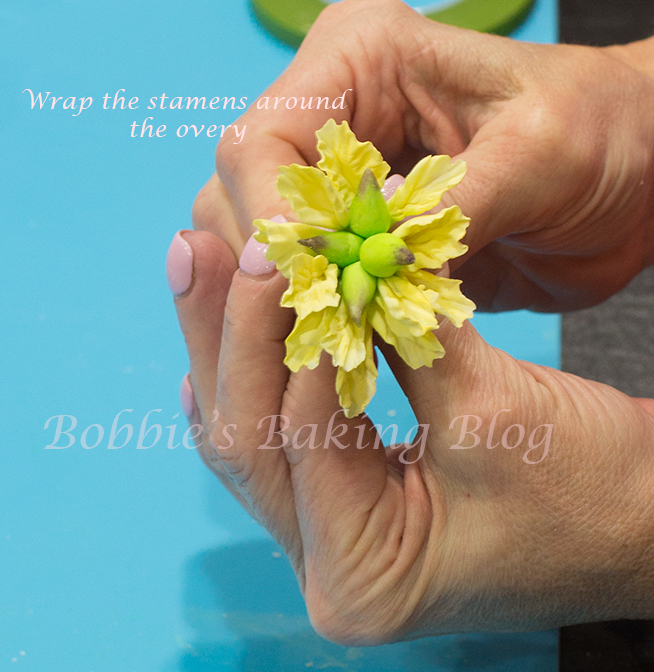
The Ovary:
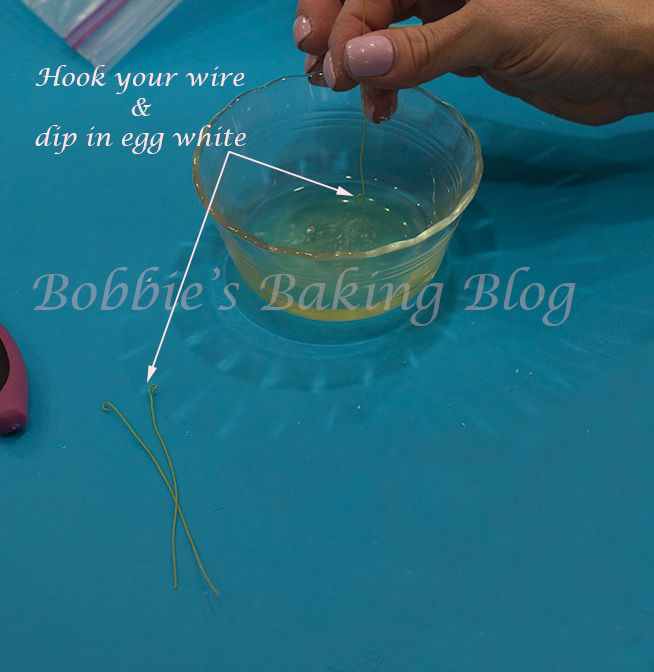
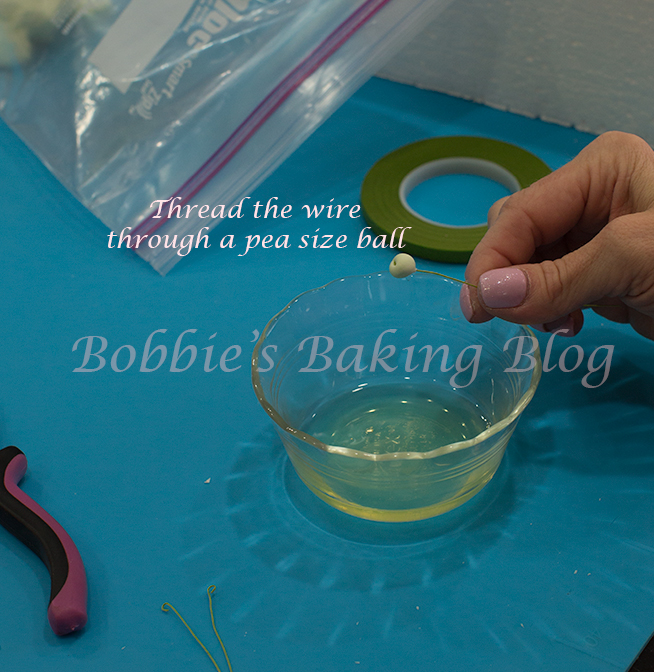
Cut 2 28 gauge wires in fourths, with fine needle nose pliers bend a small hook on one end of each cut wire. Using your well kneaded light yellow gumpaste/sugar paste, roll a pea size ball. Thread a wire, lightly dipped in egg white, through the top of the cone, the hooked side should reside in the centre of the ball. Gently thin the top of the ball into a fine tipped cone. Pinch the fine tip with your fore finger and thumb curl the top and create a ridge.
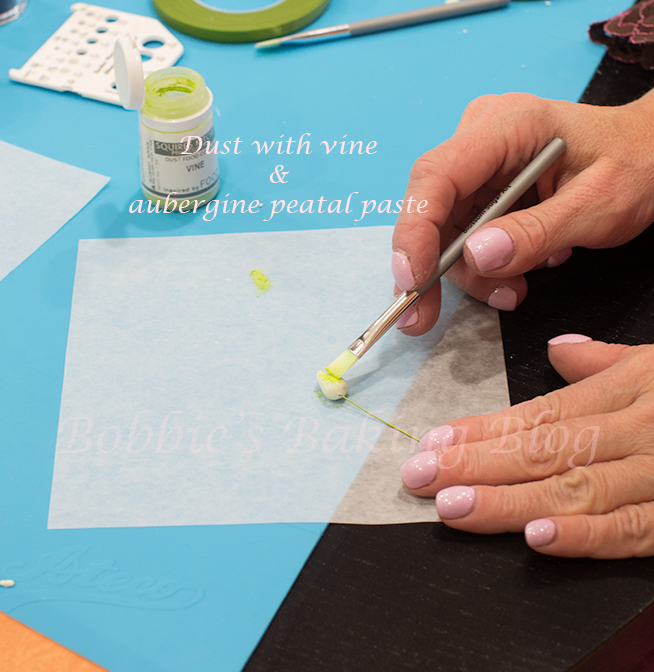
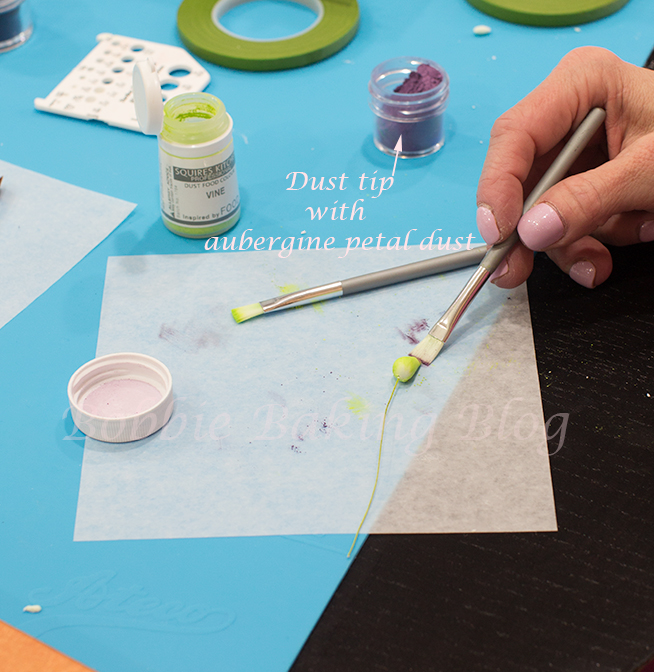
While the still pliable, color the ovary sections completely with yellow petal dust, the tip with vine and tinge of aubergine. Tape the section closely together, with the curl side pointing outwards and bend the wires with your needle nose pliers. Place the centre into a floral foam.
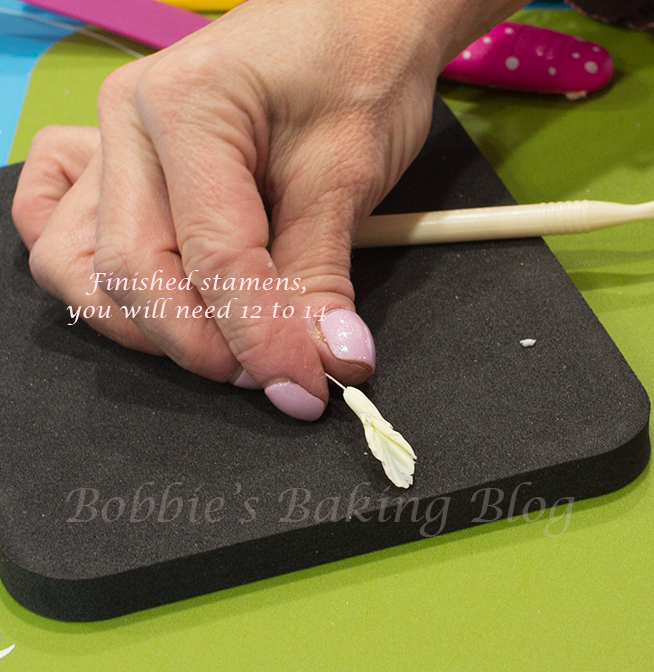
The Stamens:
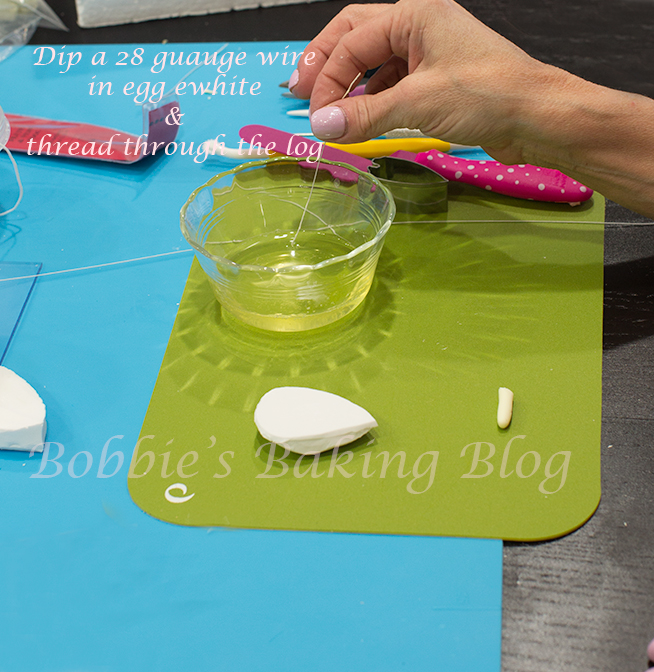
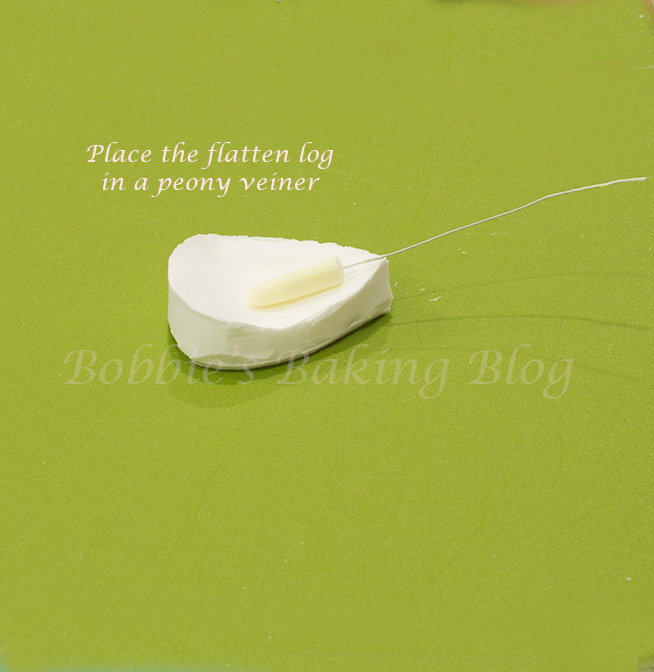
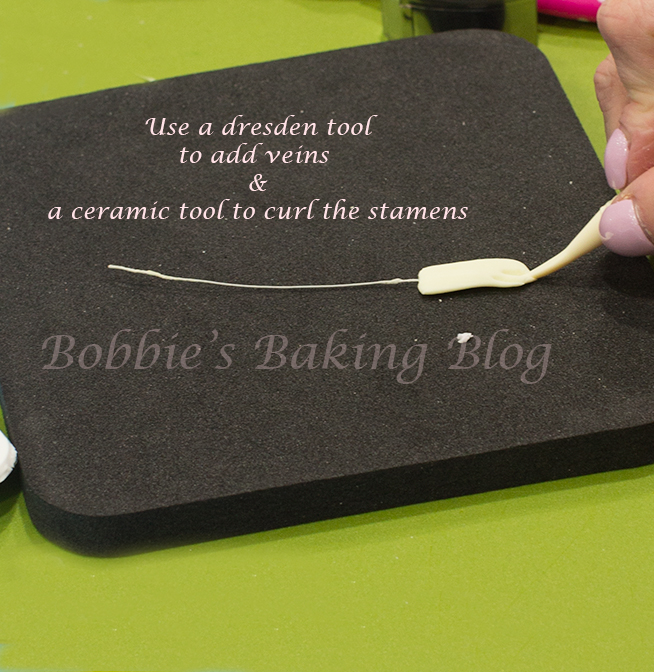
After a few failed attempts to create realistic stamens, I accidentally, with some inspiration from DF found a brilliant method. Roll a small log of yellow paste into a log, dip 28 gauge wire into an egg white, wipe off the excess, and thread the wire through the log. Next smoosh the log and vein the flatten log with the peony petal veiner. Using the side of your dresden tool to add veins, now use the dresden tool on the backside and draw the dresden tool from the outside to the centre, repeat for 11 more.
Color the entire stamens with daffodil and magnolia petal dust, and petal dust the bottom of each stamen with vine.
Attach your stamens 3 at a time to the ovary, arrange the stamens with fine needle nose pliers, and place in a floral styrofoam square to dry.

The Petals:
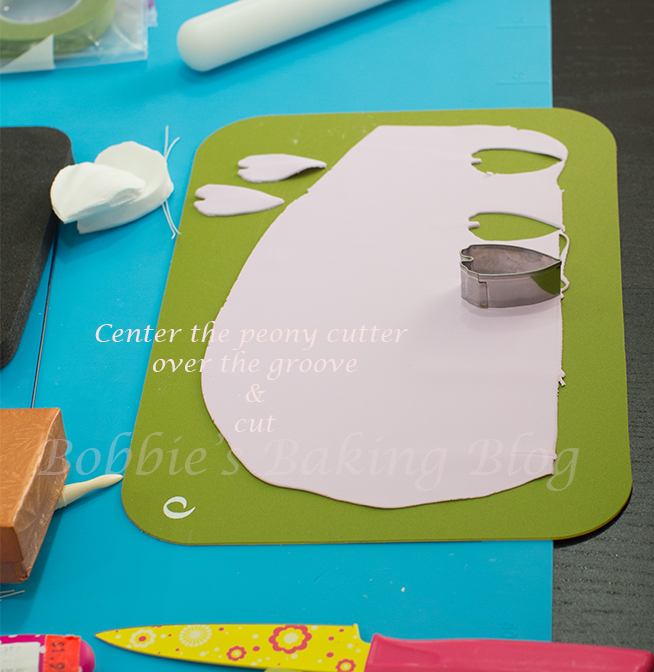
If you have a peony petal cutter set, there should be four cutters in your set. You will need five small petals, five medium small petals, five of medium large, and 10 of the largest size.
If you do not have a peony cutter set you can use various sizes of rose petals, and cut the petal into a peony shape. (I noticed google has a plethora of peony templates).
The First Five Petals:
Roll your special purple/pink colored gumpaste thinly over the groove board, lift the grooved paste with an off-set spatula, and transfer to a cutting mat. Cut your petals out with the smallest cutter, take care that the groove is in the centered of the bottom portion of the cutter. Cut all five petals, and place four of the petals under your plastic mat.
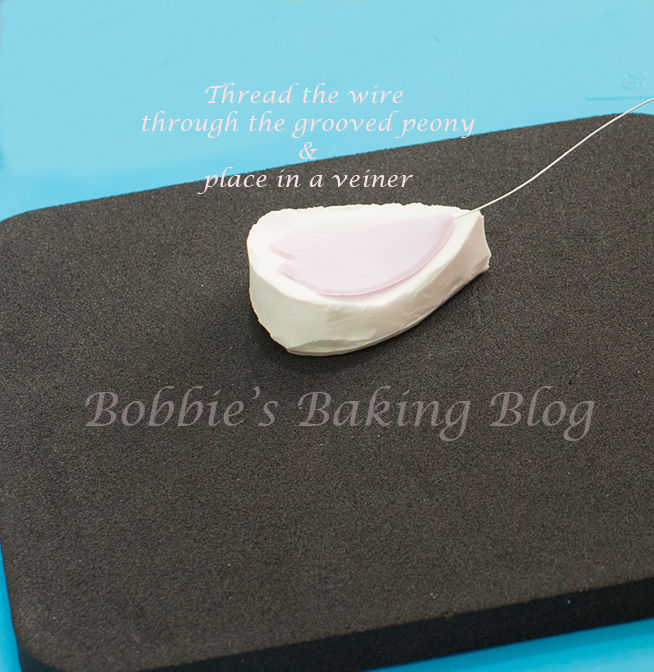
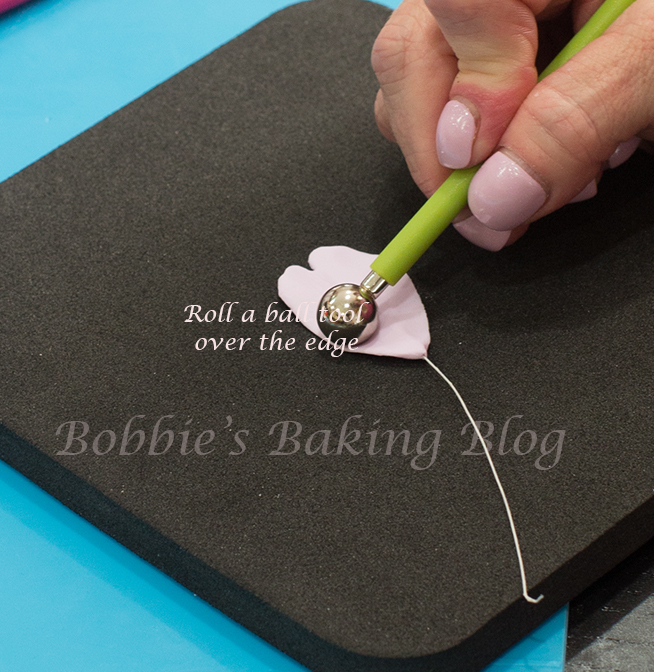
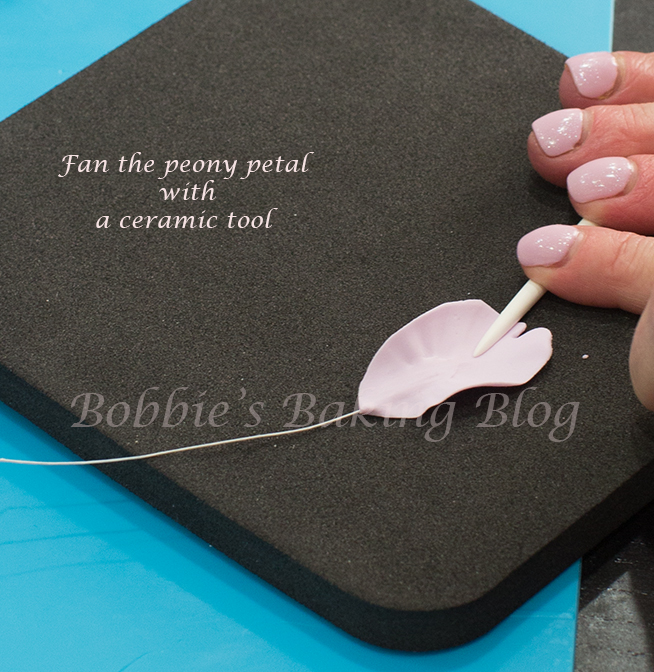
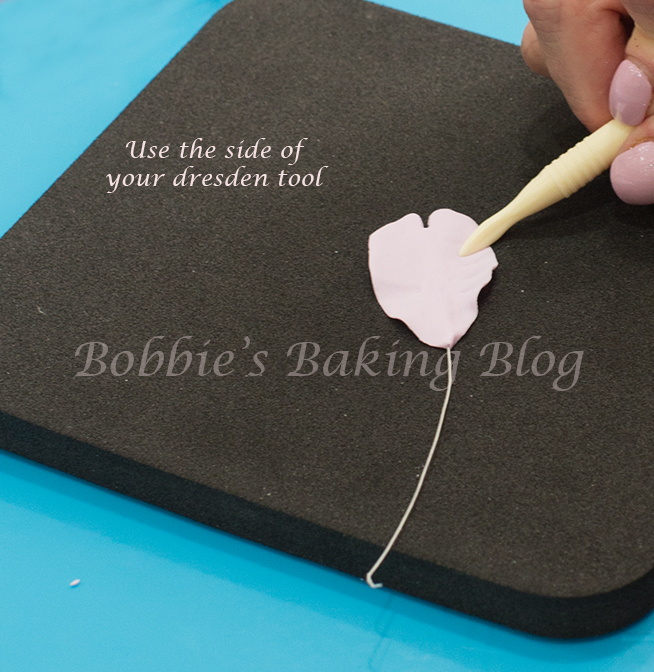
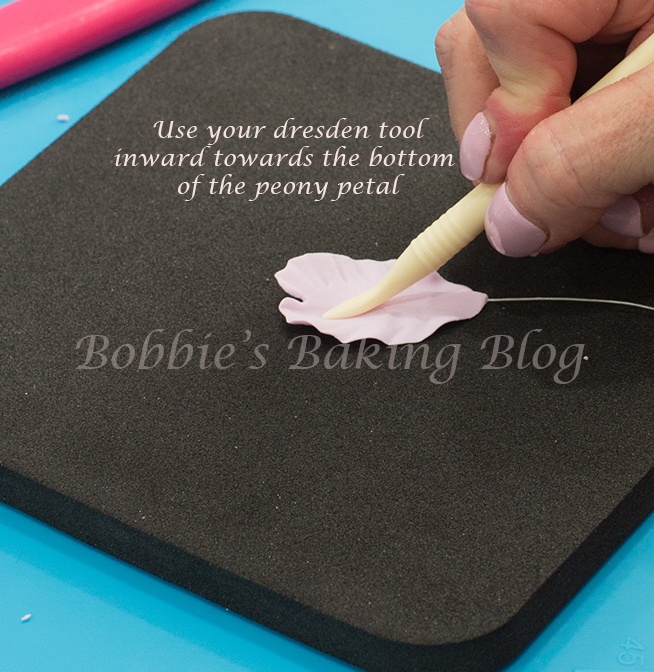
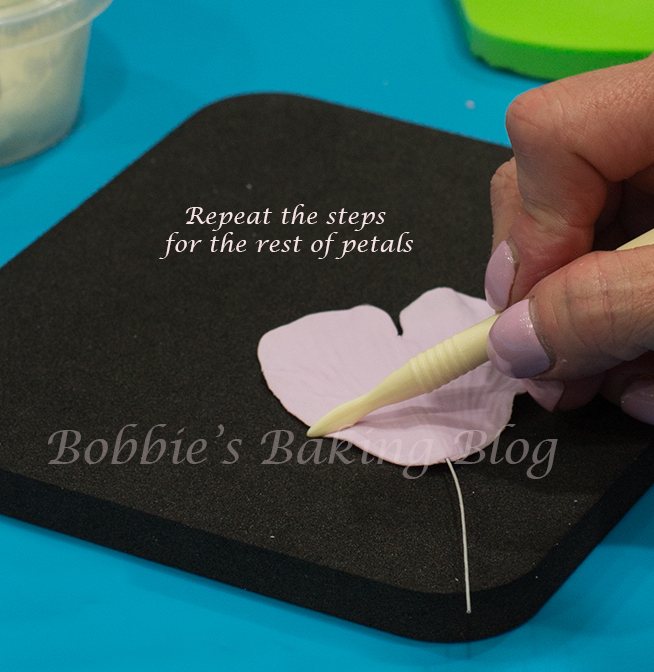
Dip a 26 gauge wire in egg white and thread the wire through your grooved portion, about 1/3 up the petal, and pinch the bottom of the petal onto the wire. Next vein the petal, release the petal from the veiner onto a foam mat using a metal ball tool half on the edge of the petal and half on the foam roll to add movement. Taking a ceramic veining to roll in a fan motion, repeat on the opposite side. Next take your dresden tool, use the side to create outer veins from 1/3 up the petal. Using the same tool on the back of the side draw from the outer petal toward the centre, the petal should begin to cup. Lay the wired petal on a madeline pan to retain the shape. An egg former will work well, or you can design a former with kitchen paper towel.
Repeat the same method for the all the petals, with the exception of the largest petals you will need a 24 gauge wire to hold the petal.
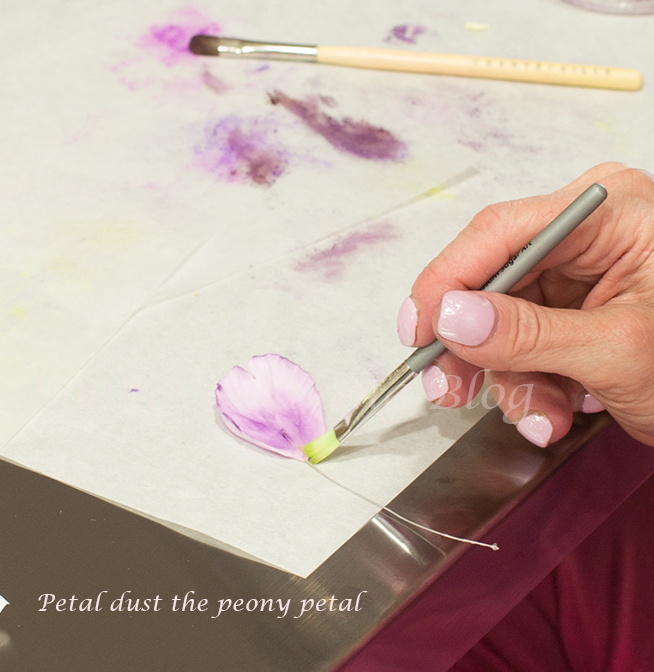
Once your petals have dried at least four hours dust the petal. Mix 1/8-teaspoon violet, 1/8-teaspoon african violet, and 1/16-teaspoon aubergine. Use a soft flat brush to brush from base towards the edges. Then brush from the edges towards the base. Add a little touch of vine petal dust at the bottom of the petal. Repeat with all the other petals, keeping in mind the large petal should have a more faded look.
Tape each of the petals about 1-inch down with nile green floral tape. I find it is ease for me to add one petal at time to the centre ovary, beginning with the smallest. Hang the peony upside down to dry completely.
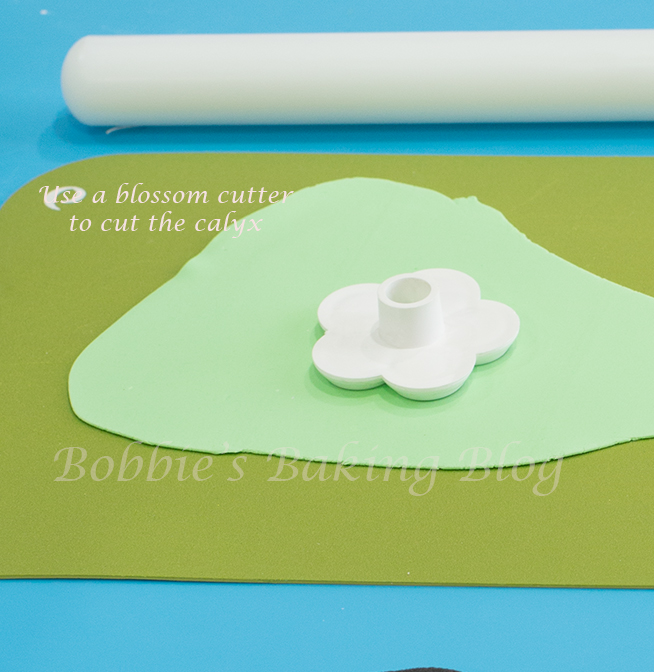
The Calyx:
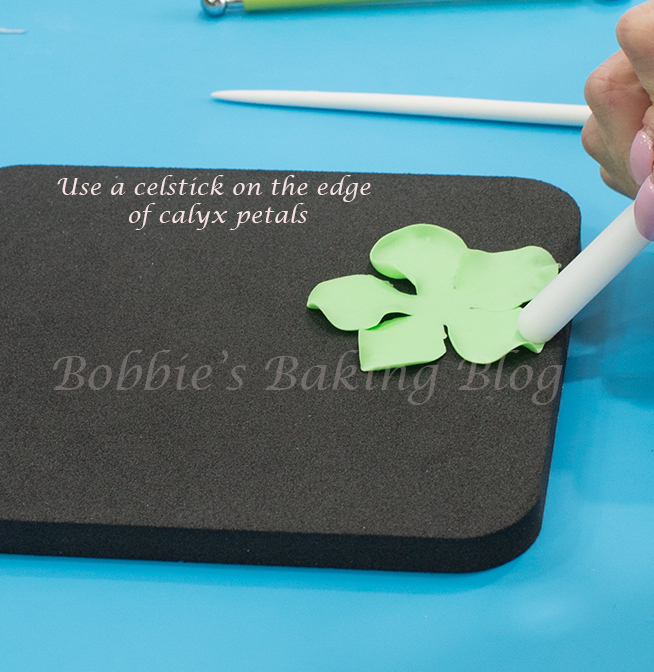
I used a five petal blossom cutter for the calyx on the open peony and a calyx cutter on the bud, both works brilliantly. Roll light green gumpaste/ sugar paste in a pasta machine to #4 or 5, or you can roll the paste by hand. Using your five petal blossom cutter, cut out one calyx. Place the the gumpaste blossom on a foam mat, using the the opposite end of a medium size Celstick (you can use your ball tool) frill the calyx enough to add movement.
Colour the calyx with yellow and vine petal dust.
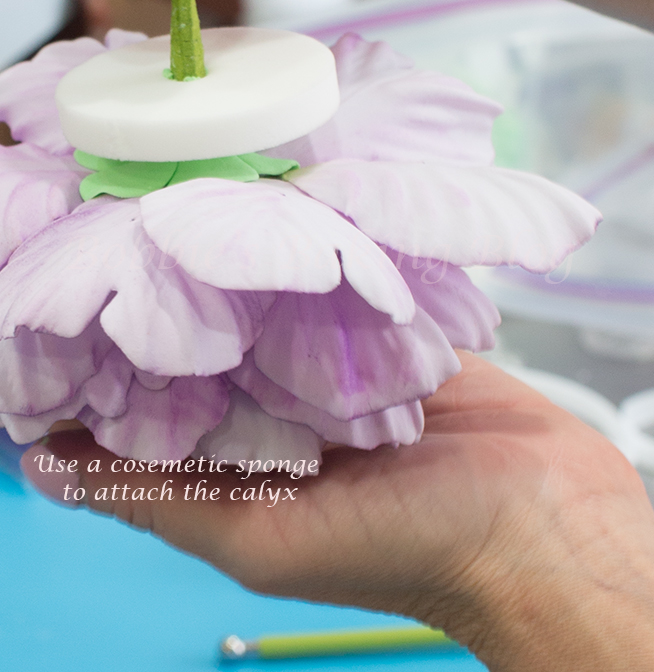
To attach the calyx prepare your cosmetic pad, with a needle tool push a hole in the cosmetic pad. Pace the calyx on the cosmetic pad, and brush little edible glue from the centre of the calyx to 1/4 up each petal. Using the needle tool again, place a little hole through the centre of the calyx.
Gingerly, while the calyx is still pliable push the stem of the peony through the hole of the calyx, turn the peony upside down on your hand, and push the calyx onto the bottom of the peony. Use the cosmetic pad to place the calyx’s leaves into place. The cosmetic pad is a Nicholas Lodge idea.
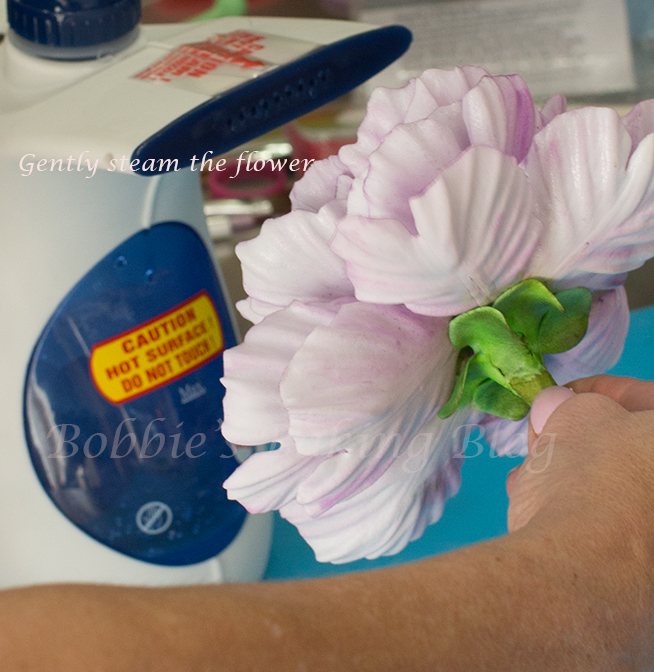
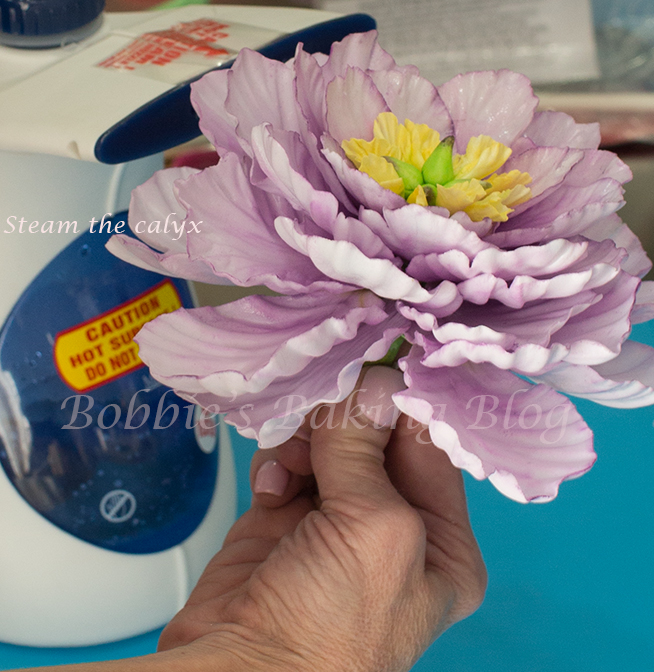
Once the the peony is dry, steam it gently to set the colour and give it a POP.
The Peony Leaves:
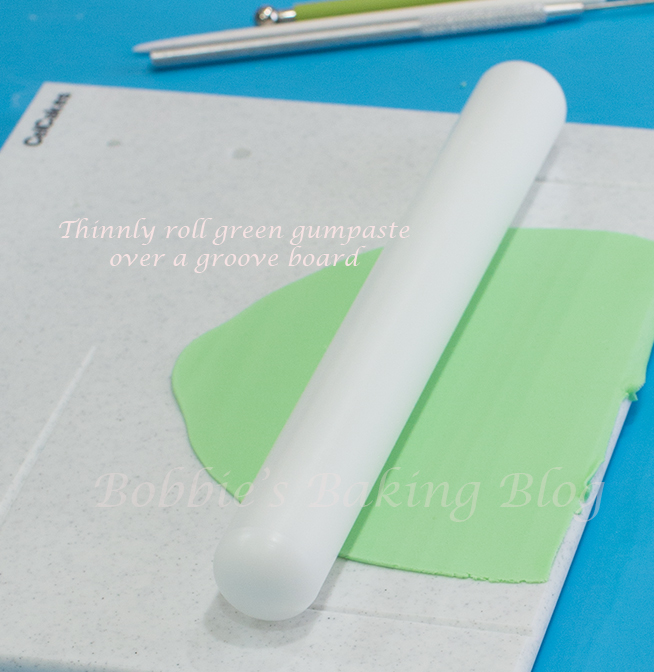
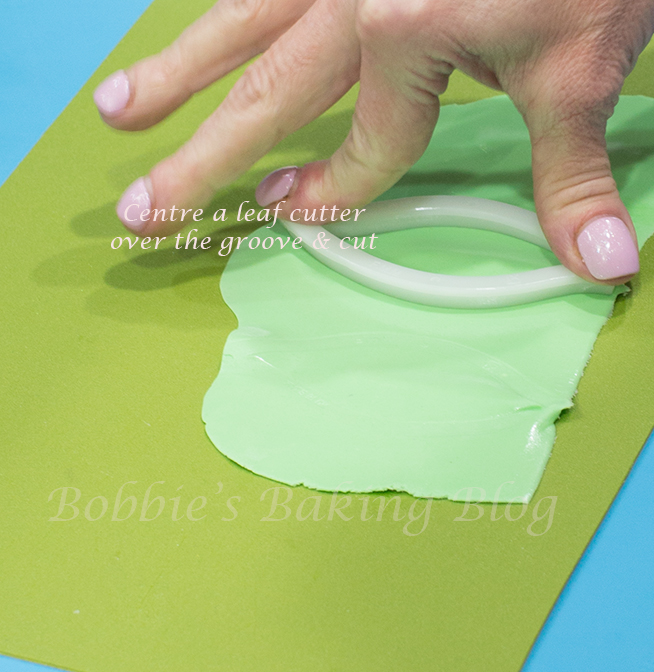
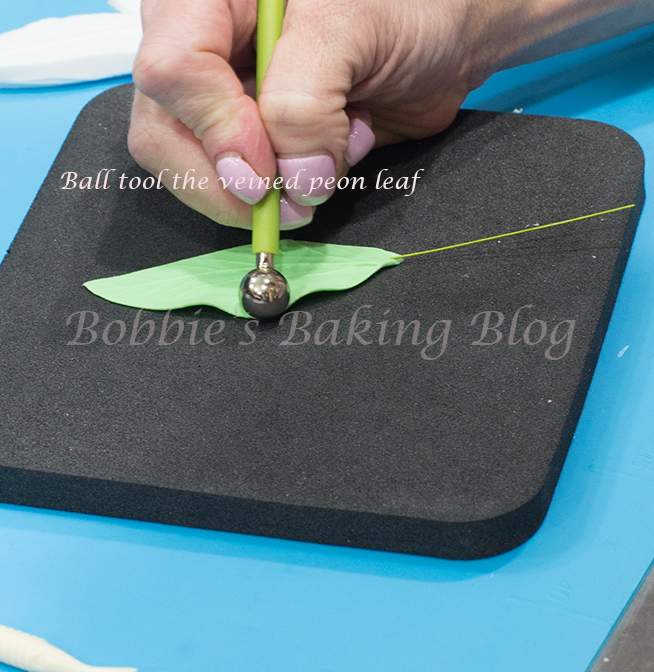
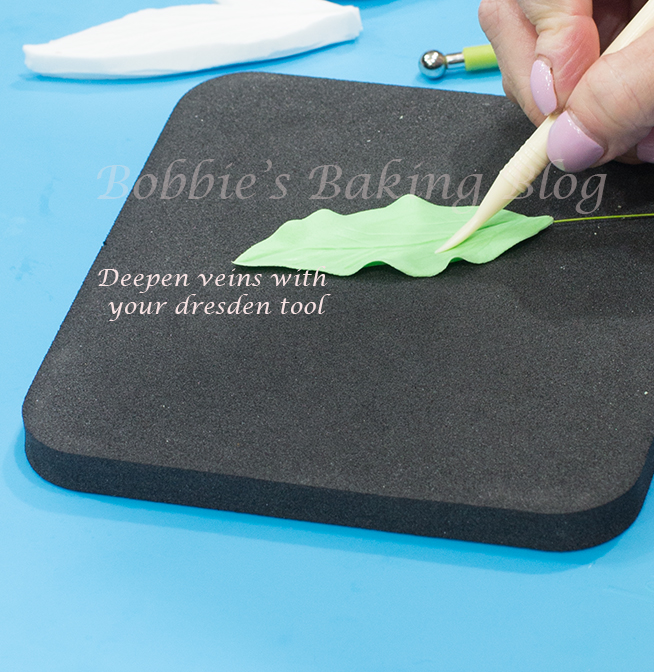
I realized I did not own a set of peony leaves, so I used the FMM assorted leaf cutter. Roll your light green gumpaste thinly on your groove board, Transfer the paste to your cutting mat, and cut out six leaves at a time. Place five of the paste leaves under your plastic mat. Thread a 26 gauge wire in the thick part of the groove, pinch the leaf on the bottom to the wire.Vein your leaf with a peony leaf veiner, release the leaf on your foam pad. Using the ball tool half on the outer leaf and half on the foam pad. Use the dresden tool to deepen the veins. Hold the tip of the leaf and the bottom, gently pinch and exaggerate the center vein and create a slender leaf.
You want the leaf to dry in a “V” shape. Once dry, colour the leaves, one at time, with light green covering the vine starting at the base and fanning out to edge, layer with a slightly heavier dusting of foliage, and accent the center and an edge with aubergine.
Assemble Leaves:
Peony leaves have three leaves per branch, with one leaf in the centre and the two on either side. Tape the leaves together with nile green tape and steam the leaves. Once the leaves have dried brush with glaze.
I added a few Tuberoses and buds in the same colour theme as the peony and bud. Sydney arranged the flowers and leaves on the cake. I must admit it is wonderful having her home for Mother’s Day.
She fell in love with the peony cake, but I have a few cakes to create for her choose from, she might need a little help.
I hope you have fun creating your own peony cake!
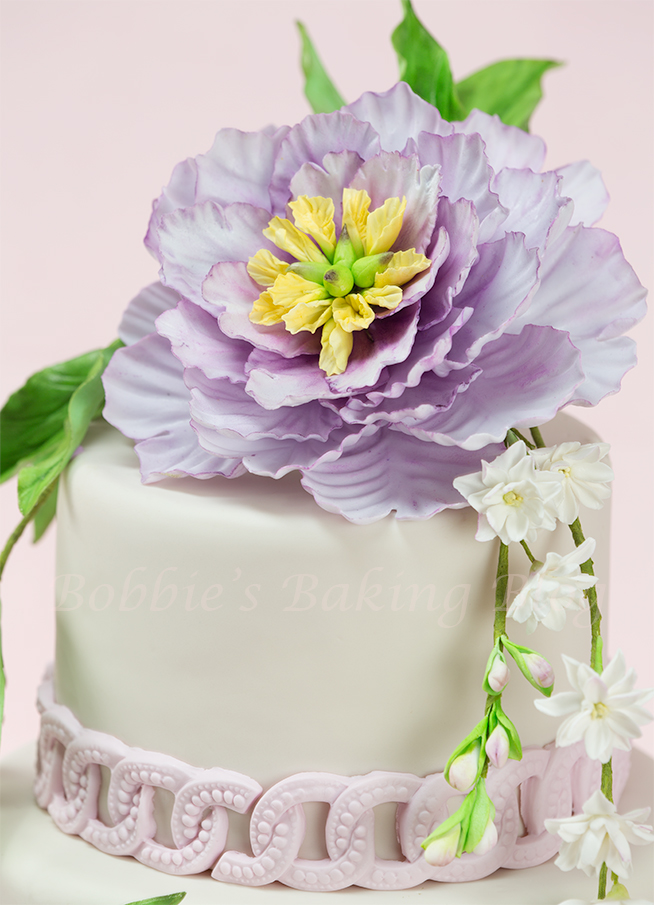
I adore the Tuberoses!
Enjoy!
Voila!


wow wow wow have made a peony but not an open or a spray peony this is fantastic.. soo have to try these 🙂
Thank you, peonies are one of my favorite flower
This tutorial is great, I just love the techniques you have used. I would like to add the stem of white flowers as well, would you mind sharing that technique?
Jane, thank you. Are writing about the tuberoses?
Yes, they make such a nice addition to the arrangement
I just posted a blog on the Tuberoses.