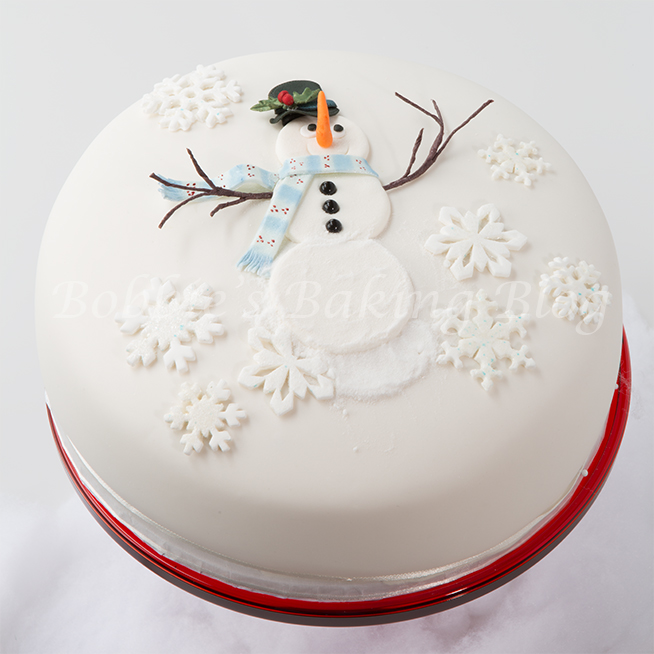
Burr…it’s cold outside!
With the holiday season approaching (quite fast) I thought it might be fun to share a tutorial on a sugar snowman cake. I was inspired by Alan Dunn’s Christmas Cakes (a perfect gift for any cake enthusiast). I knew the cake would be a fun project, but I must admit I was caught off guard at the amount of excitement that came over me as I began bringing the cake to life. I found myself giggling like a first grader as he become more real. I wish there was snow outside so I could build a replica as well.
DIY Snowman Cake:

He so cute..If you think of an appropriate name let me know!
Materials:
- 1-round 22 cm/ 9-inch 4 layer chiffon cake
- White fondant
- Red fondant
- Black fondant
- Gumpaste
- Black dragees
- Egg white, for cake glue
- Food paste, poinsettia red, blue, orange, & green
- Holly berry cutter small, orchard cutters
- Petal dust, sunset orange, orange, kiwi green, forest green, avocado green, baby blue, pearlized crystal blue & poinsettia red
- Royal icing, white
- Super fine sugar
Equipment:
- Ball tool
- #7 piping tip/tube
- 28 gauge
- 3 round circle cutter graduating in size
- Small graduating square cutters, Stephen Benison
- Brown floral tape
- Needle nose pilars
- Pme plain wheel
- Pounce wheel
- Small round cutters
- Cocktail stick
- Paint brushes
- Gumpaste rolling pin
- Ribbon cutter
- Stay fresh mat
- Foam board
- Aceto knife
Find all the decorating needs for this cake here.
Pre color the fondant and gumpaste, wrap tightly in plastic wrap and set to the side.
Prepare your mise en place.

Mise en place
The Snowman’s Body:
He just brings a smile to your face!
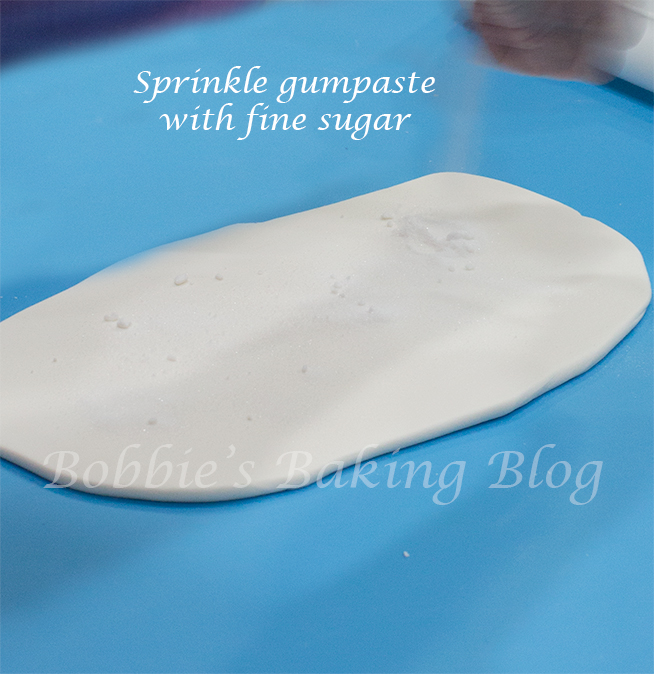
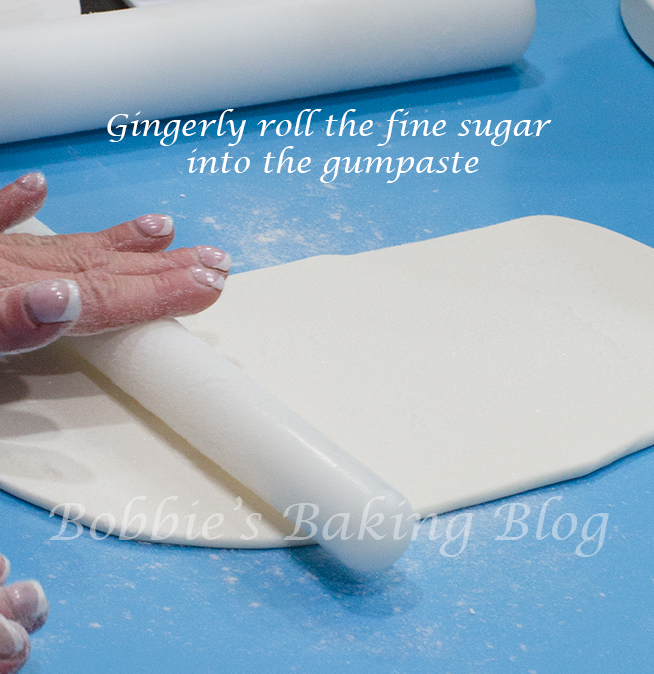
Knead half of the fondant with half of the gumpaste. Roll out the half n half kneaded paste, sprinkle with super fine sugar. Roll the paste out again, sprinkle a little more sugar, and gently roll the sugar into the paste.
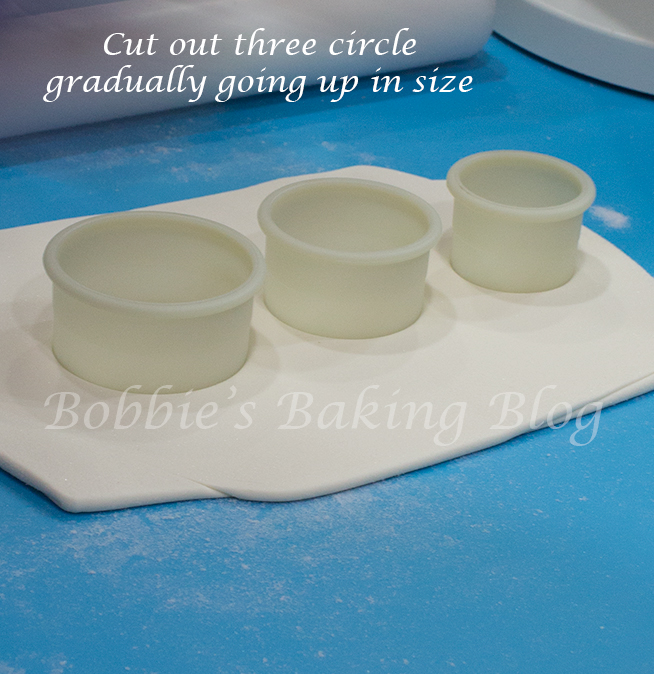
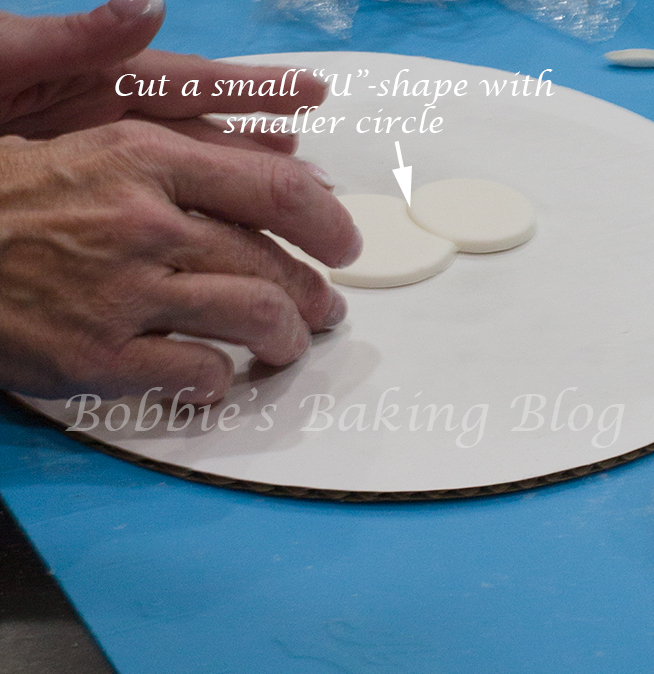
Cut out three circles graduating in size. Cut each circle’s top with the next size smaller circle cutter (excluding the head) at the top, this will create a “U” to place the body together. Soften the edges of the circles, without frilling them. Lightly brush each circle with egg white, place the circle side into the “u” shape of the next larger circle, smooth with a ball tool to attach.
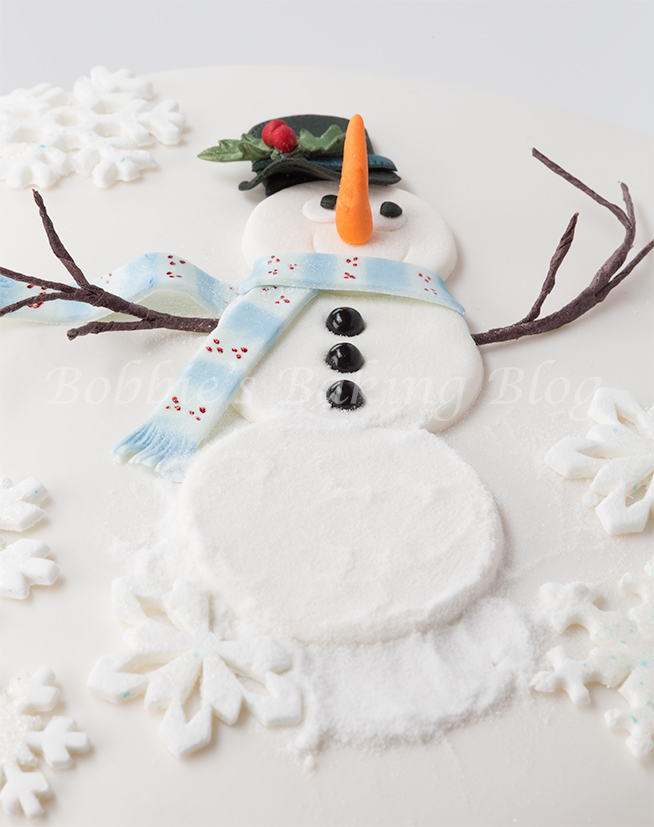
Creating the Face of the Snowman and Placing Him on the Cake:

I can’t help thinking of Frosty the Snowman
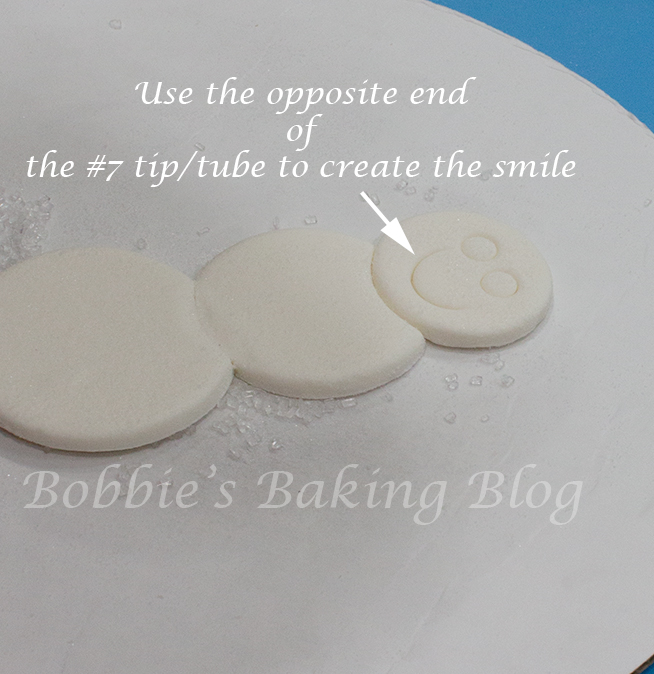
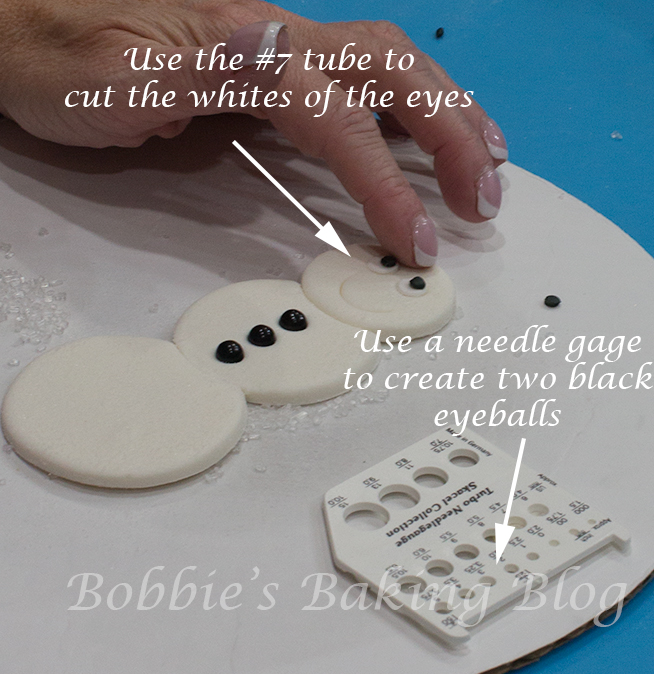
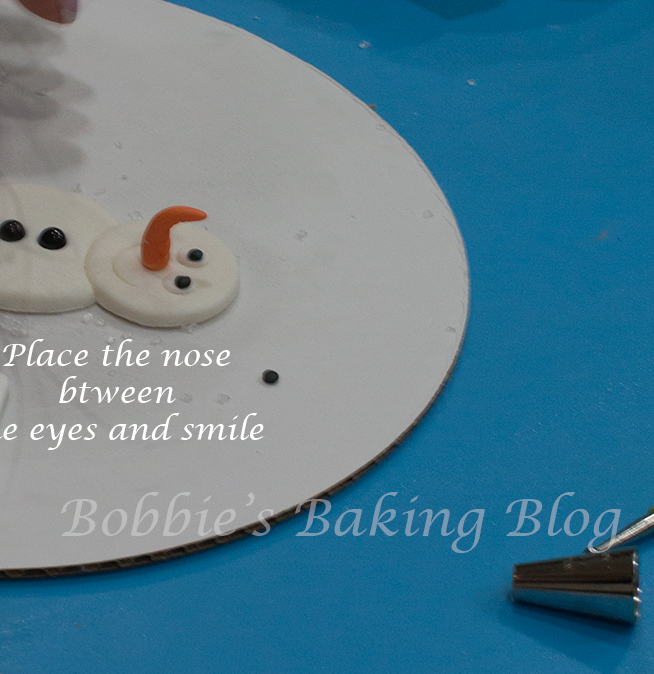
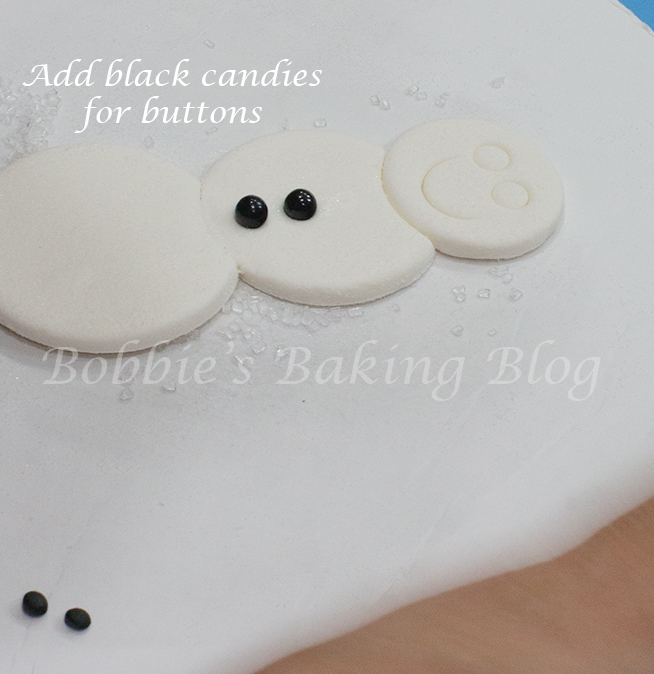
For the eyes, use the piping side of your #7 piping tip/tube, about 1/4 from the top of the head indent two circles, roll two small balls (use your needle point circle gauge to insure they are the same size), and flatten. Brush a very small amount of egg white to the back, attach inside the eye circles you just created. Now knead a small amount of black gumpaste, roll two smaller circle (gauging for even size), flatten the cirles sightly, and attach with egg white to the white part of the eyes. Using the opposite side of your #7 tip/tube indent a “U” (about 1/4 from the bottom of the head) to create an adorable smile.
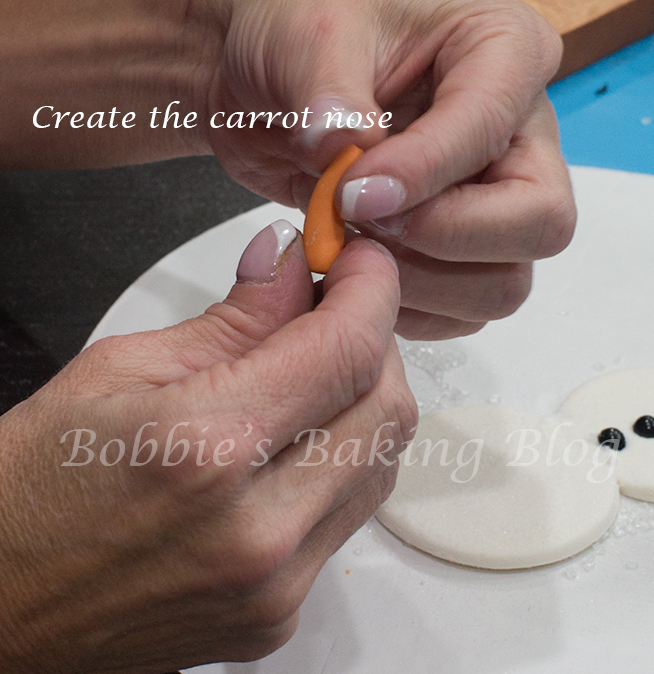
For the nose, knead a small amount of orange colored gumpaste, shape into a cone with a pointy tip. Flatten the bottom, and with your PME or plain cutting wheel create carrot lines. Brush a small amount of egg white to the flatten bottom and attach to the face. Add 3 black dragees to the center of the middle circle of the snowman.
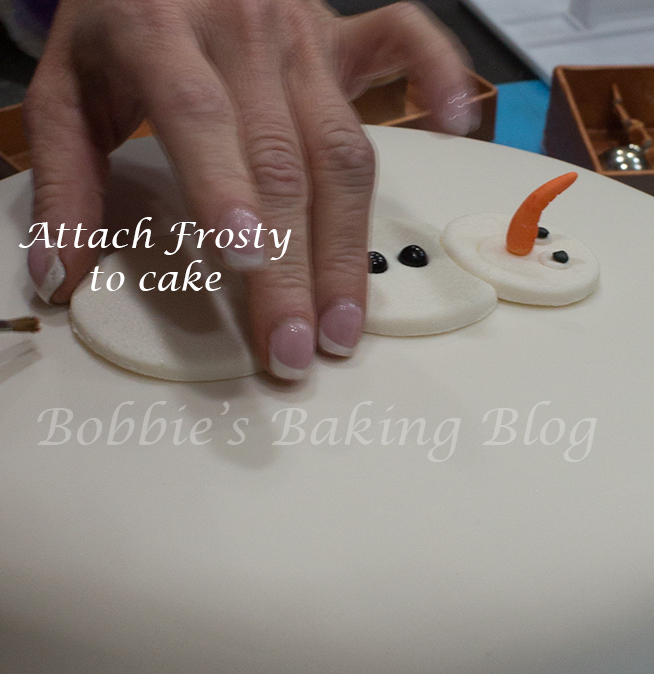
Find the center of your cake, mark it with a scribber, brush a little egg white to the area. Carefully lift the entire snowman with a triangle spatula lay over the egg white brushed area.
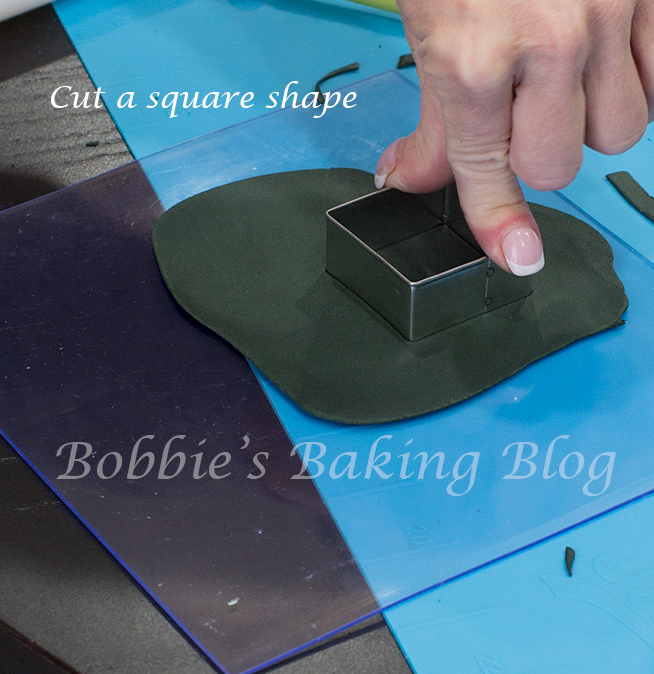
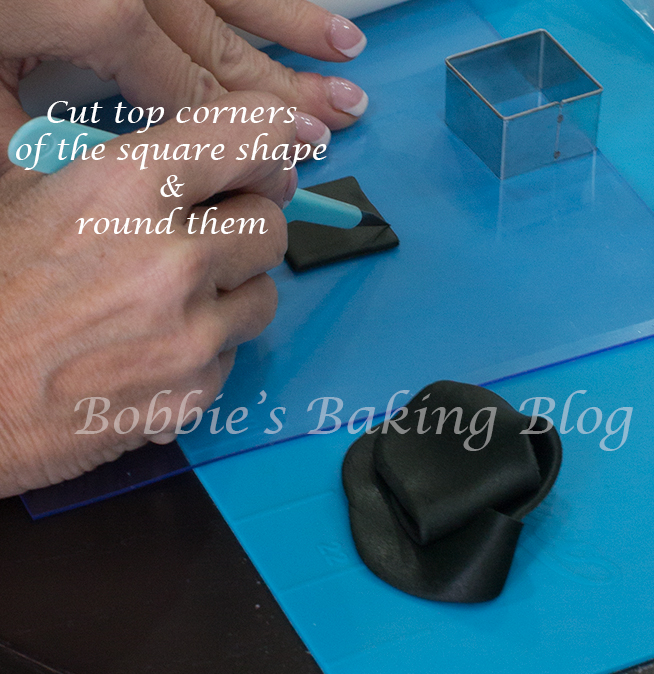
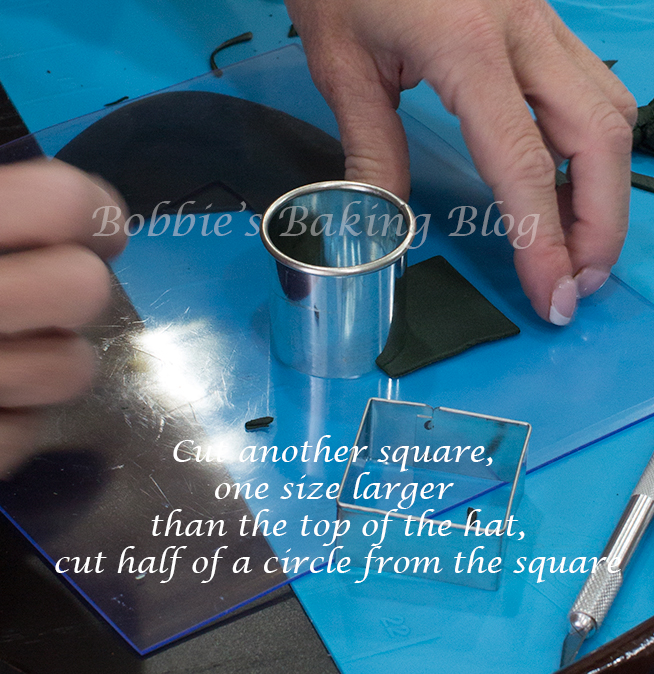
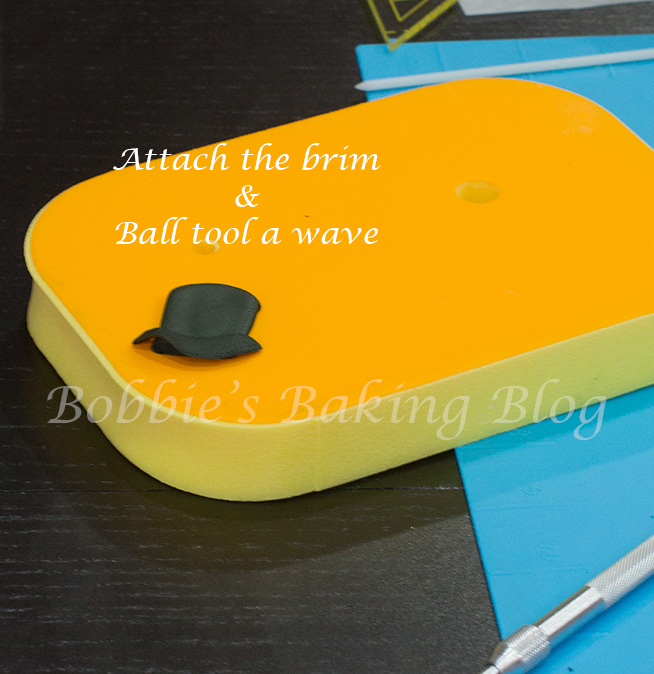
The Hat and Holly Berries:

If do not have a snow outside, build a sugar snowman cake in your kitchen!
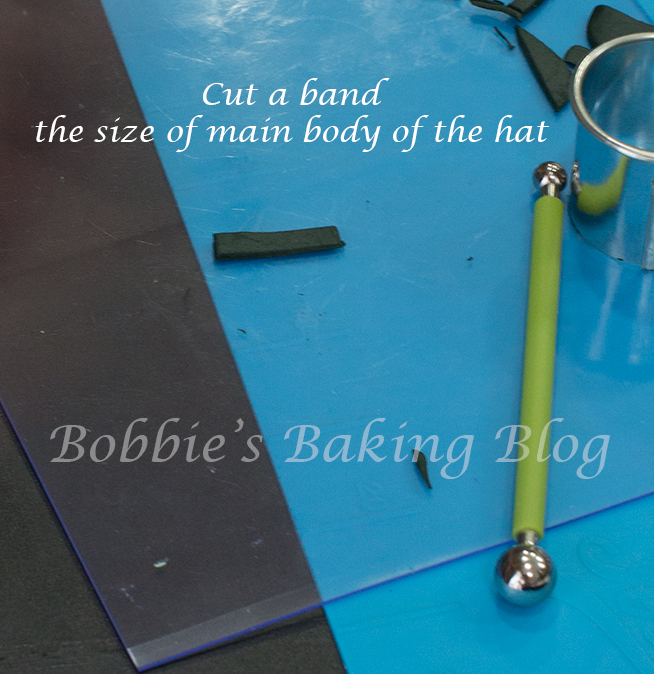
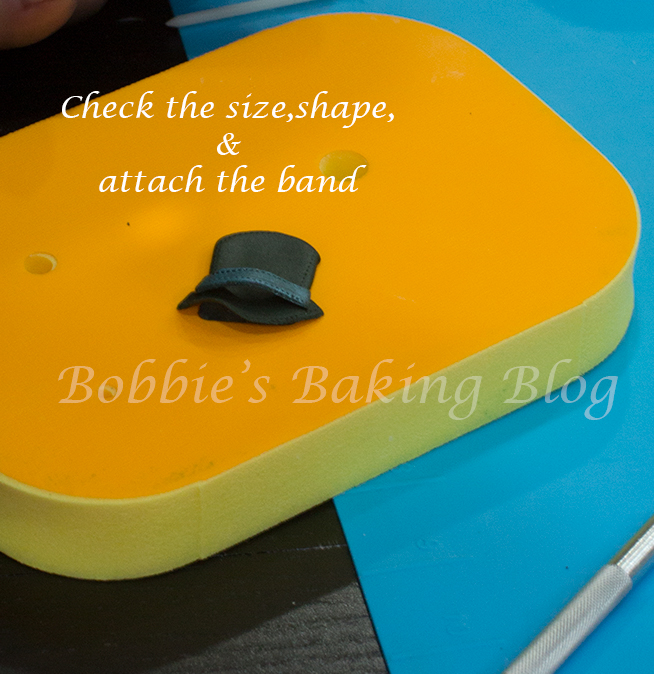
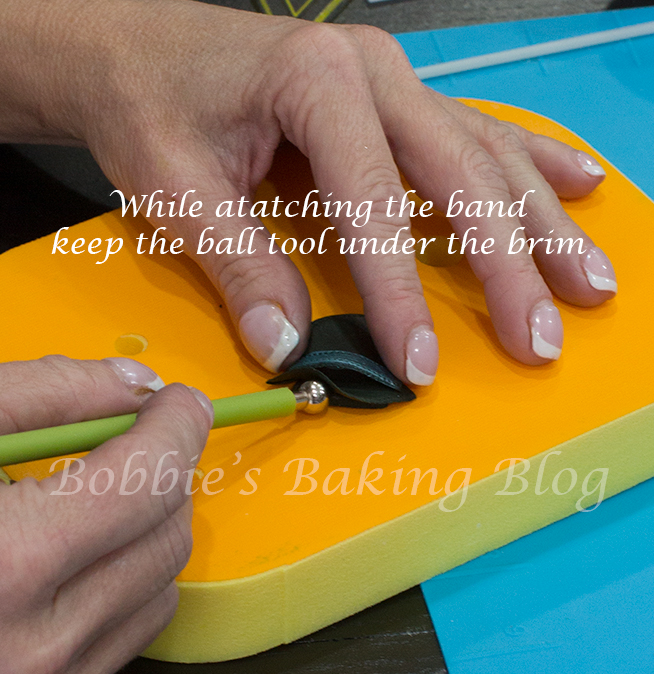
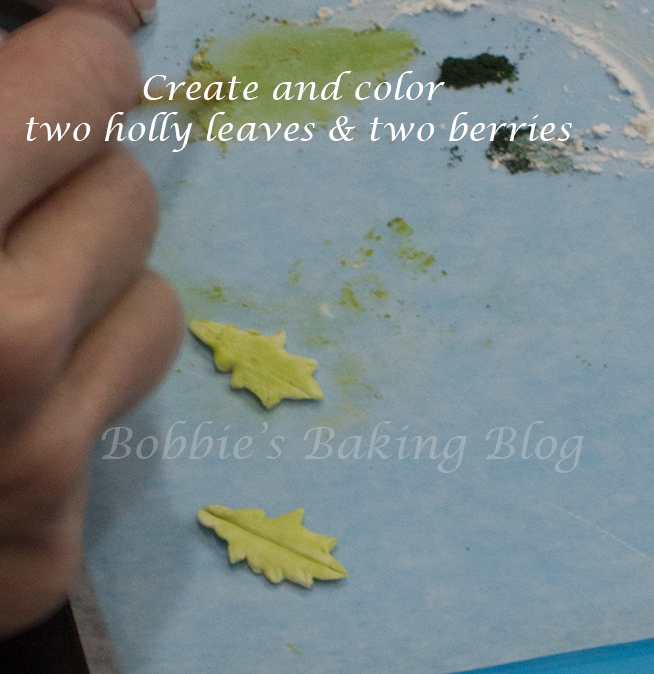
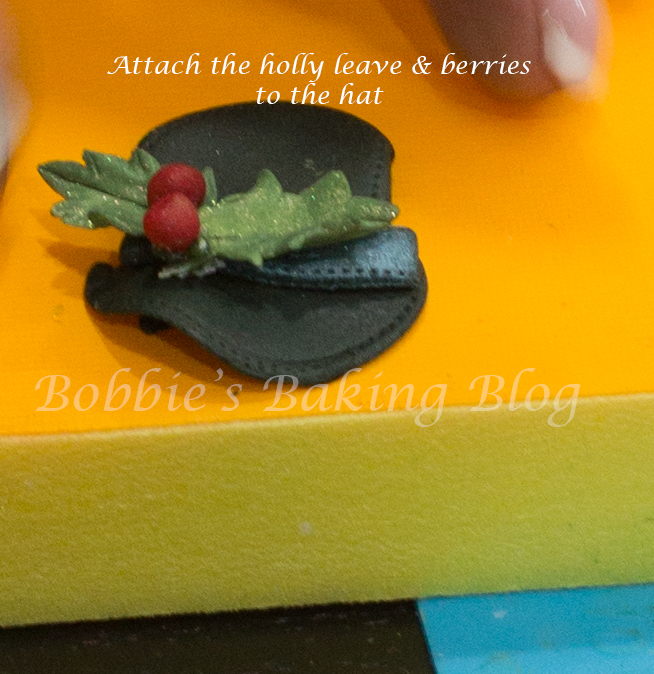
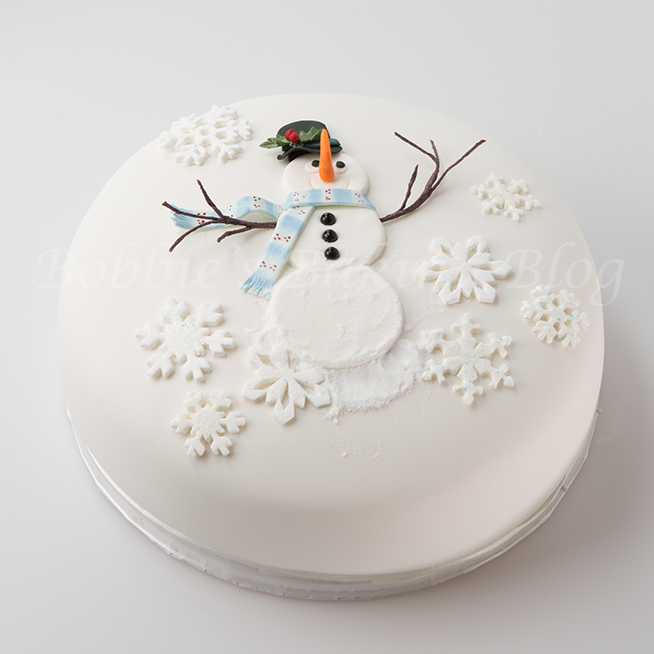
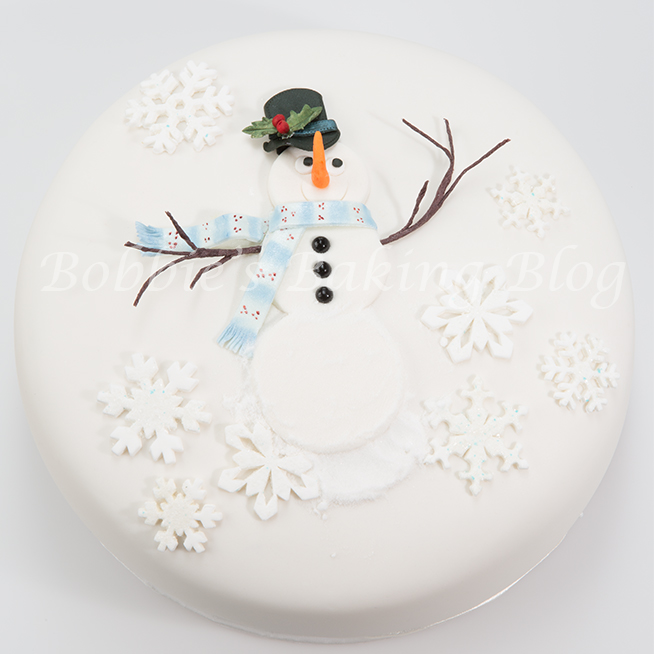
Roll a piece of black gumpaste thinly, cut out a 1.27cm/ 1/2-inch, cut a square and cut the two top corners on an angle. Round the corners (to give the appearance of a round top hat). At the bottom of the square use a small circle cutter, cut a “U” shape to fit on the snowman heads, and use a pounce wheel to add stitching . For the brim roll out some more black gumpaste cut a slightly large square 1.52cm/5/8-inch, and place a circle cutter .25cm/1/4cm from the bottom of the square. Use the piece of black gumpaste that you just cut from inside the circle cutter, round into a crescent shape, smooth with your finger and use the pounce wheel to add stitching. Use a small amount of egg white to attach to the hat, bend the brim slightly to create a lift. For the band cut a strip of rolled thin black gumpaste and cut to fit the length of the top part of the hat, spray with PME blue lustre spray, add stitching and attach to the hat (place a small ball tool under the brim). Prepare two holly berries, two holly berry leaves, and attach with a egg white just below the band. Lightly brush the cake just above the snowman’s face and attach the hat.

The Scarf and Snowflakes:
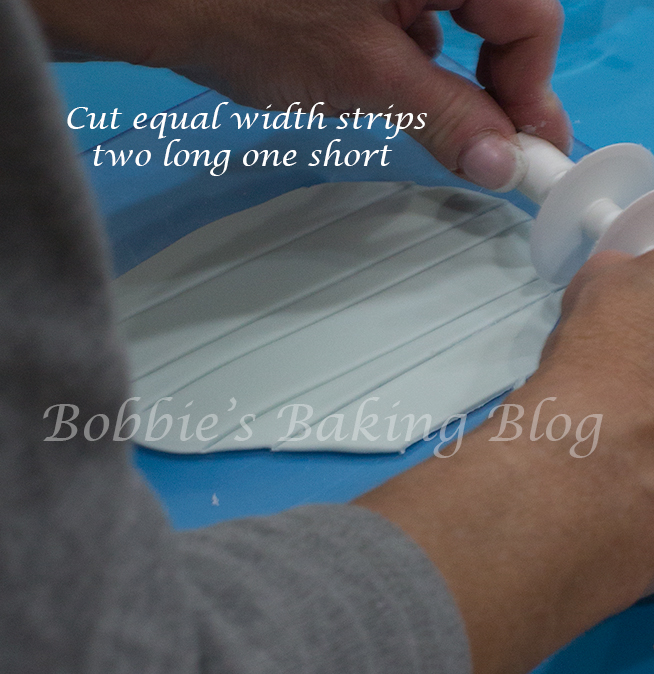
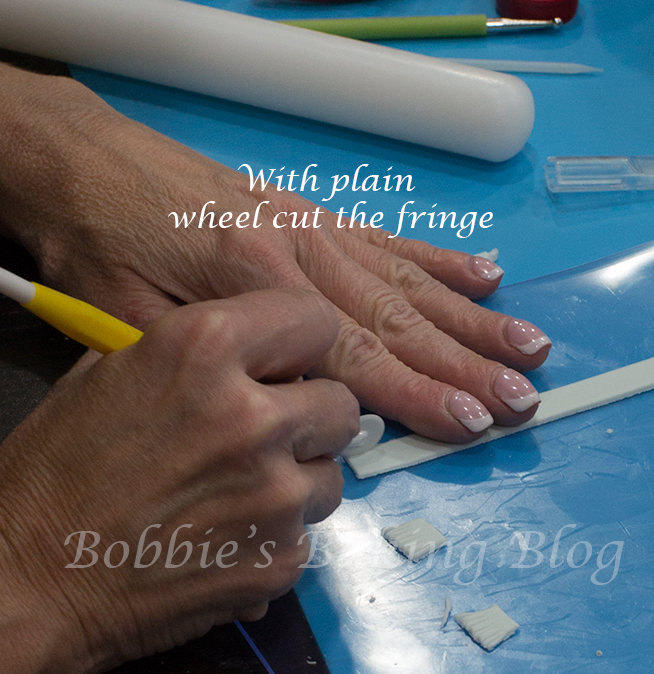
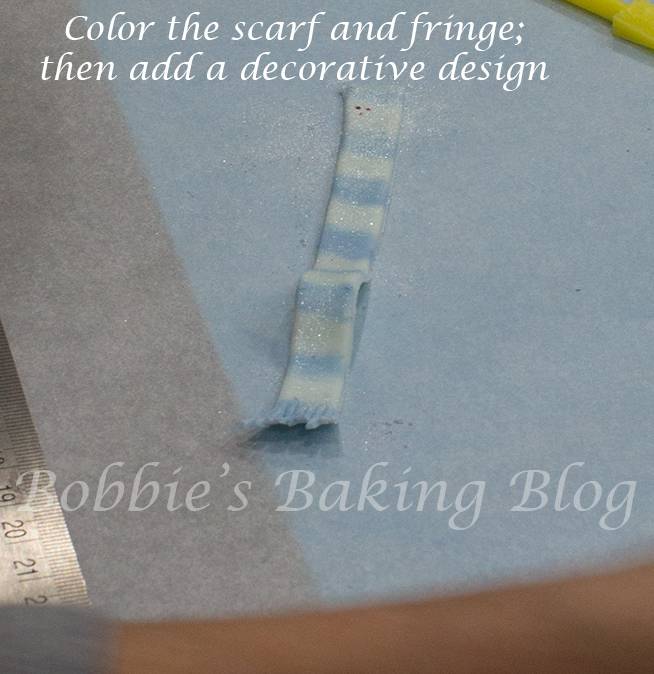
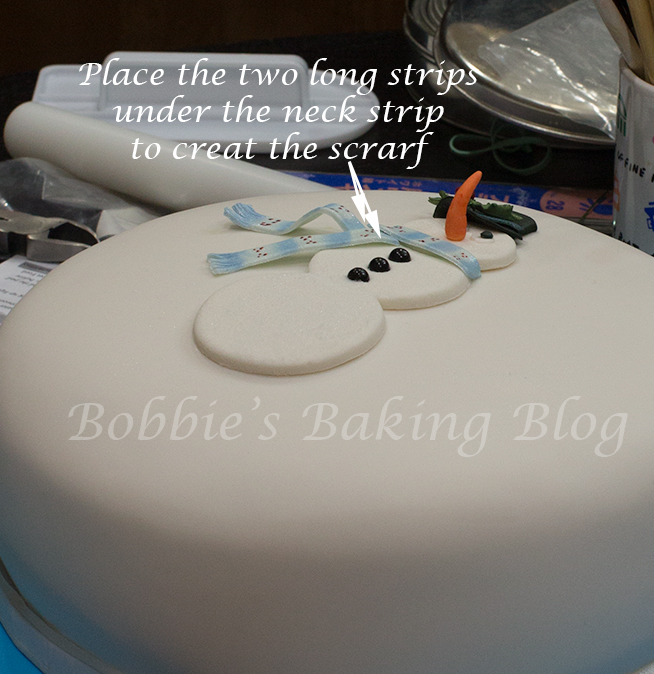
The scarf is made of three strips equal in wideness, two long and one short. Color a small amount of gumpaste light blue, knead well and roll out fairly thin. Using a ribbon cutter (or a ruler and a-ceto knife) cut three strips, lightly ball tool the strips, but do not frill. On the two longer strips design the fringe using a plain cutting wheel cut short slits at the bottom, and use a celstick to create movement, and a bend one of the strips, this will be the back part of the scarf. Color all three strips with baby blue petal dust, block off small sections for the baby blue color to achieve a striped look, color the entire scarf pieces with pearlized blue, with a small pointed brush and red decorative berries. Cut a small crescent shape on the strip with the bend so it will fit snug against the snowman. Attach the two longer strips at the left neck side, make sure the crescent cut strip is against the snowman’s neck (laying on the cake), overlay with the short strip, and tuck around the neck. Add a little movement to the scarf.
Prepare the snowflakes with white royal icing and super fine sugar. Pipe the royal icing with a #5 tip, on a lightly greased piece of parchment paper, pipe the snowflakes out of royal icing & crystal sugar. (I photo copied a snowflake ornament and reduced the size for the template), and while the icing was still wet sprinkle liberally with crystal and super fine sugar. Allow the snowflakes to dry. Once the snowflakes are completely dry brush with egg white and attach decoratively on the cake.
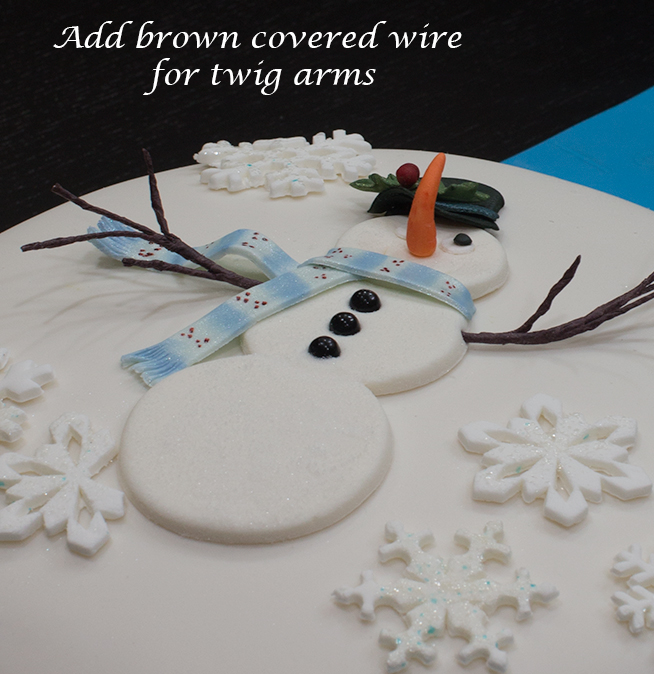
For the Arms:
Wrap half of a 28 gauge white wire with brown floral tape, cut the remaining white part off (cut into 6 pieces). Cut the brown covered wire in half. Wrap the brown wire around the remaining white wire as you attach the short pieces of wire to the base. Insert the arms into the snowman’s sides.
You will be amazed and cherish the time you spend with your family creating the snowman cake; watch your children’s eyes as your snowman comes to life!
Doesn’t it remind you of a celebrity snowman?
Enjoy!
Voila!


So cute! Thanks for sharing! Can’t wait to make one of these for Christmas!
I would love to see your snowman cake!