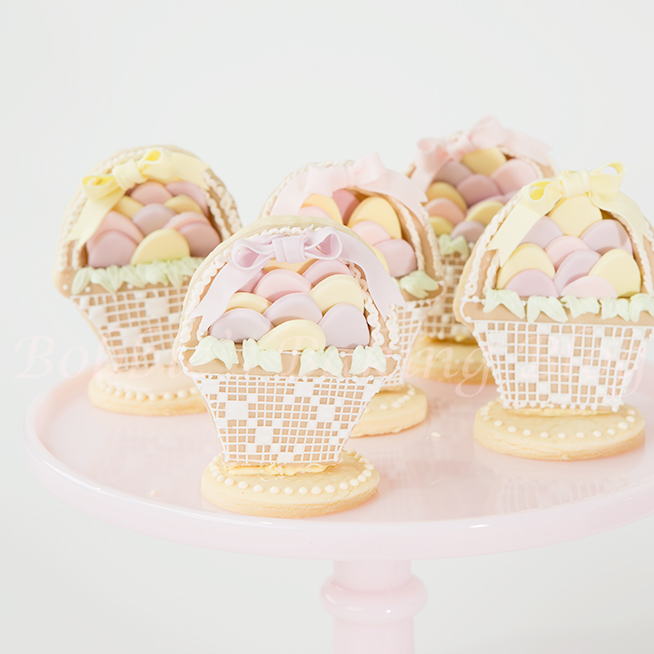
This one occasion it is alright to put all your eggs in one basket!
Needlepoint royal icing piping is a unique technique to take your sugar cookies or cakes (even cupcakes) to the next level. I adore the intricate piping skills that can be achieved with a cornet and nozzle. Although piping a needlepoint pattern onto a sugar cookie or cake is pretty straight forward it is time consuming. A detailed needlepoint royal icing cookie can take several hours to finish. The end result is a sensational work of art. Anikó Vargáné Orbán has amazing needlepoint royal icing work, visit here site ,I promise you will not be disappointed!
With Easter just a about a month away I thought teaching the basic method of royal icing piping would fun. The Easter baskets above are basic needlepoint, however once you are comfortable with this technique the possibilities are endless.
Equipment:
I adore the little bows!!
- Basket sugar cookie cutter
- Parchment Paper cones, between 6 to 10
- PME # 1 tip/tube
- PME tip #4
- PME st 51 tip/tube
- Mini egg cutter
- Knife
- Mini off-set spatula
- Fondant rolling pin
- Fondant smoothers
- Pasta Machine, optional
- Dampened paper towel
- Either a PME holder or a damp paper towel folded to cover the parchment filled paper cone
- Plastic art brush
- Turkey trussing needle or pin
Materials:
- Royal icing soft peak consistency, Recipe below
- Royal icing bead consistency
- Fondant, half Cinnamon flavor and Mocha
- Fondant, Wedding White, colored in assorted pastel flavors
- Piping gel, clear
- Cooled boiled water
- Food paste, pink, brown, yellow, leaf green, and electric green
- Edible glue, hand made or bought
- 1-Sugar Cookie Recipe
Visit Shop 5th Avenue Cakes for supplies
Dried Albumen Royal Icing Recipe:
- 907 grams Confectioners Sugar, sifted
- 1/2 teaspoon Vanilla Extract or almond extract
- 30 grams dried albumen
- 3/4 cup Luxe water
Add the dried albumen to luke warm water and mix well.
Using the paddle of your standing mixer place mixed dried albumen and confectionary sugar in mixing bowl of the standing mixer, stir with a grease-free spatula just to incorporate. Add extract and mix on the lowest speed until ingredients are combined. Scrape bowl down as needed. Mix for 10-20 minutes on medium-low speed. Mix until icing forms peaks and doesn’t lose its shape. If the icing appears too thin add more powdered sugar; if icing appears too thick add more water.
Cover icing in an air tight container. The icing will keep for up to 7 days in a dark cool place, DO NOT PLACE IN THE REFRIGERATOR.
Prepare your mise en place.
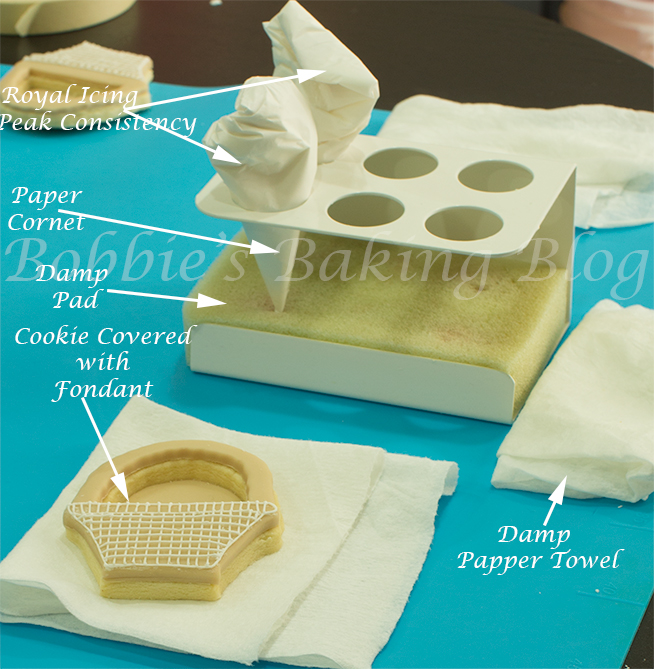
Mise en place
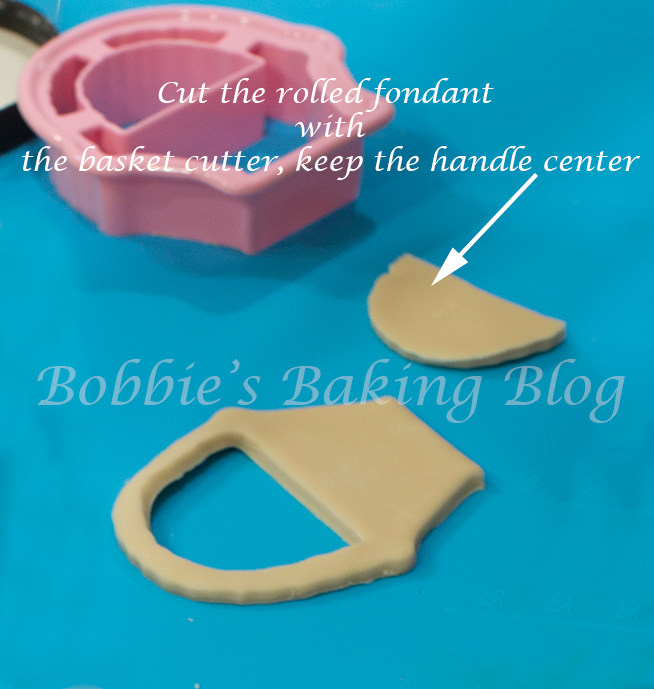
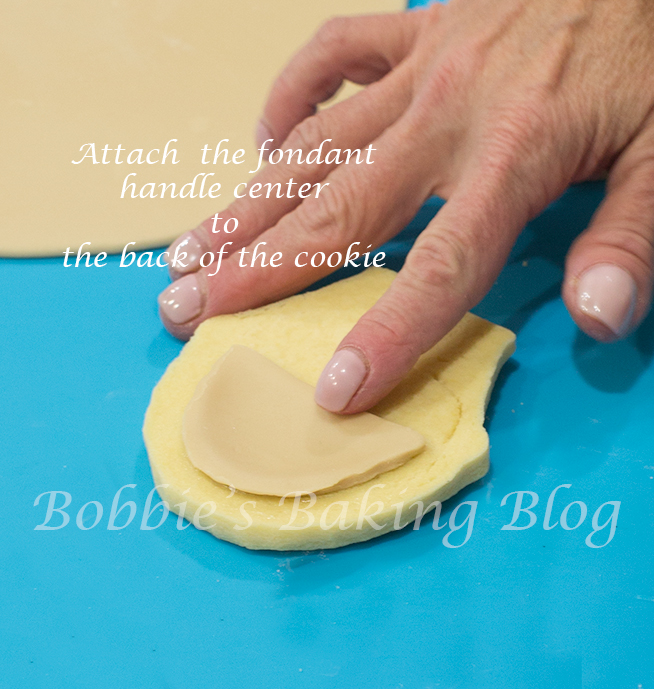
Knead the fondant mixture together, roll the fondant out and place in a pasta machine on #1. Cut the fondant with the basket cookie cutter, keep the basket center.
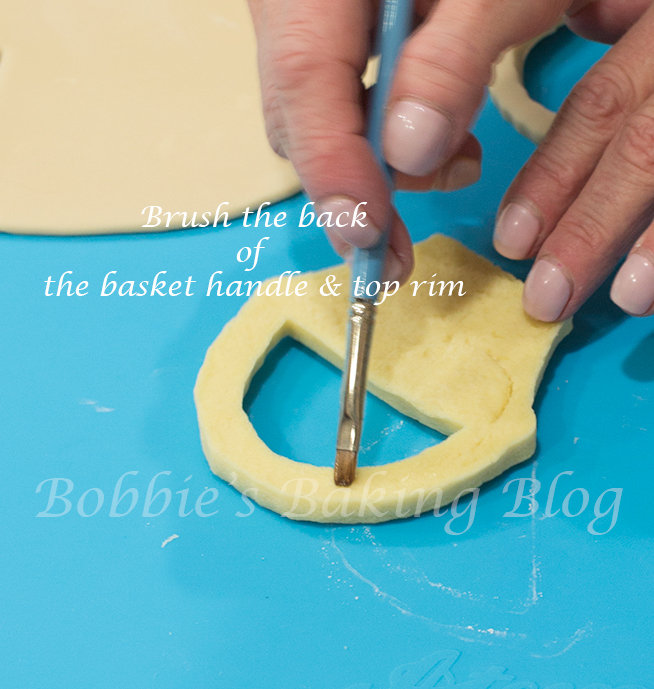
Turn you cookie to the backside, brush the handle and the rim of the basket with piping gel, attach the inset with the smooth side facing the basket, and smooth.
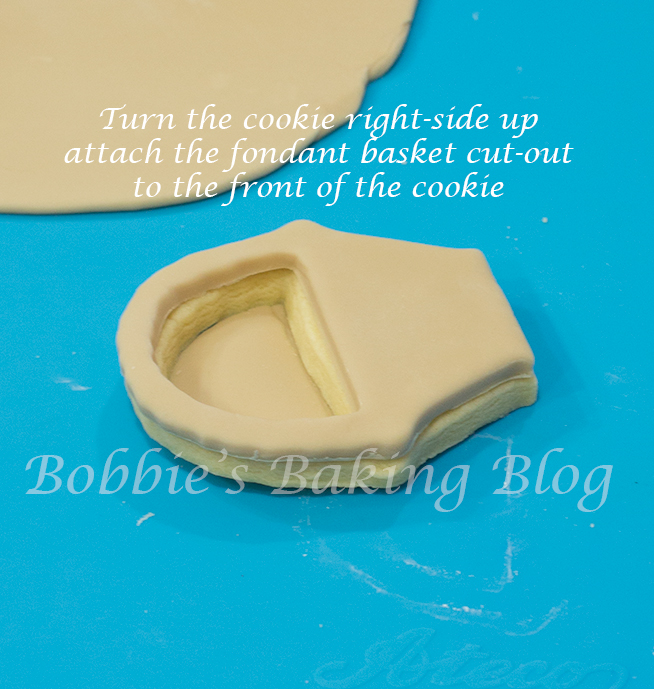
Turn the cookie upright and attach the basket fondant cut out with piping gel.
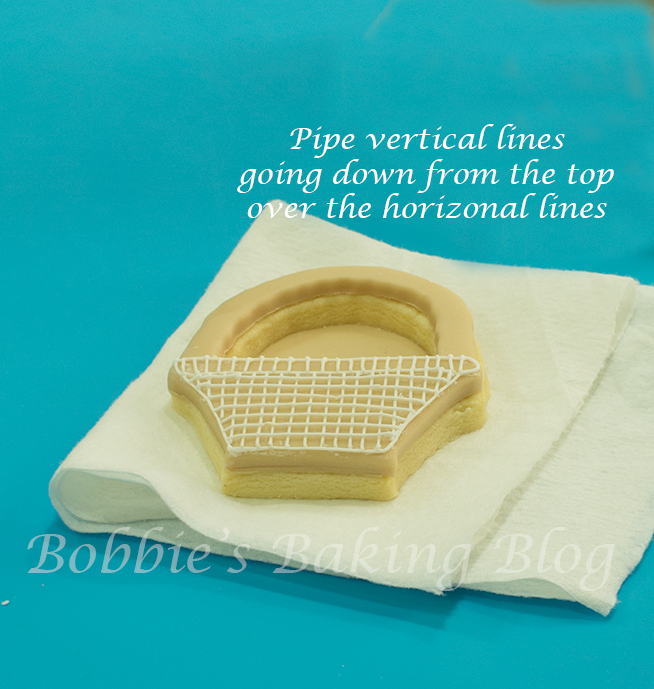
Piping the Royal Icing Lace Lines:
Try this royal icing string-work recipe
Fit a parchment paper cone with a PME #1 tip/tube and fill the cone 1/2 way up with soft consistency royal icing, fold the top of the cone over.
Check the consistency of the royal icing by piping a line between your fore-finger and second-finger gently wiggle your fingers, if the line does not break you are good to go.
Begin at the bottom of the basket piping horizontal lines, pipe the lines equal distance to the rim. Check your consistency again, if you are good, pipe the vertical lines the same distance as the horizontal lines.
(If your consistency has thicken cut the tip off and rinse the tube, pipe the royal icing into a bowl and add cooled boiled water by the drop until your royal icing is soft consistency. Redo another cornet/cone).
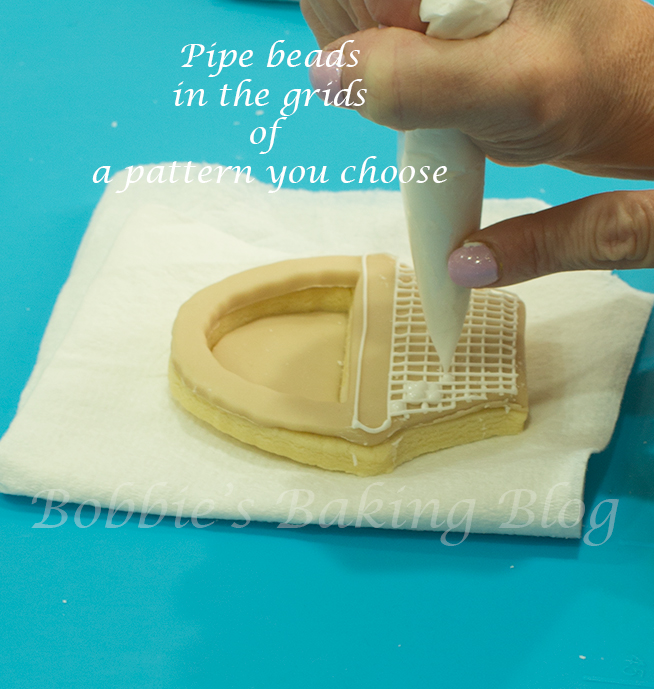
Filling the grids:
Before you prepare your cornet/cone look at your cookie and decide on the pattern you want.
Create bead consistency royal icing. Place the bead consistency into a cornet/cone without a tip. Pipe the icing on a work surface if the icing pipes out into a round bead you’re good to go.
I tend to wrap my parchment paper cone without an opening, if this is the case cut straight at the tip to create a small opening. Pipe a bead in the grids to copy your design.
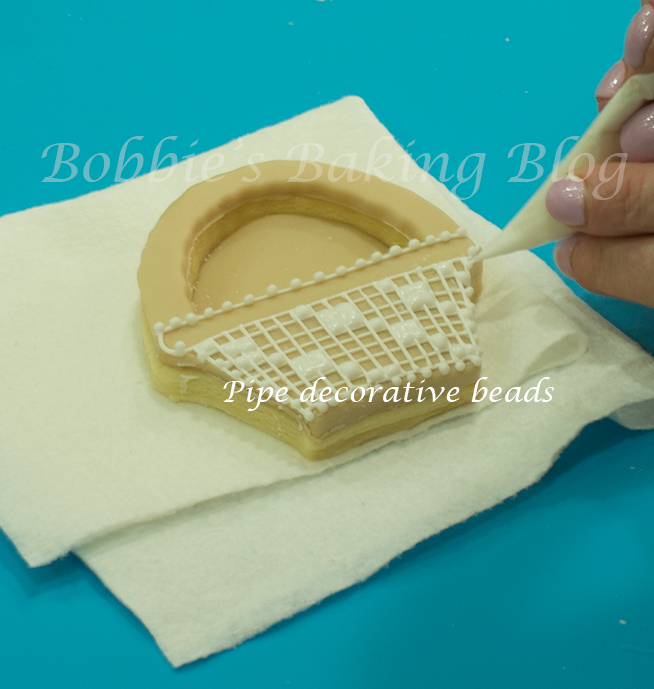
When you have finished piping the grids pipe decorative beads around your basket.
The lace process is time consuming, start with one basket at time and sit in a comfortable position to pipe.

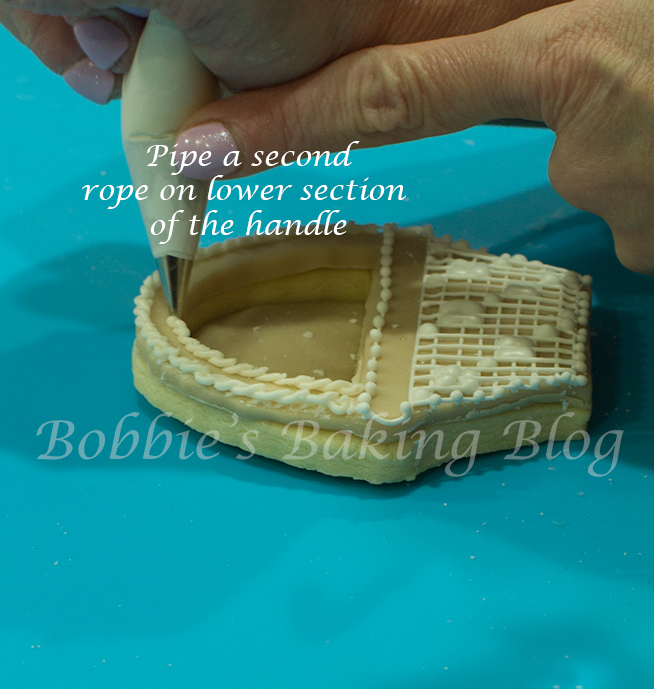
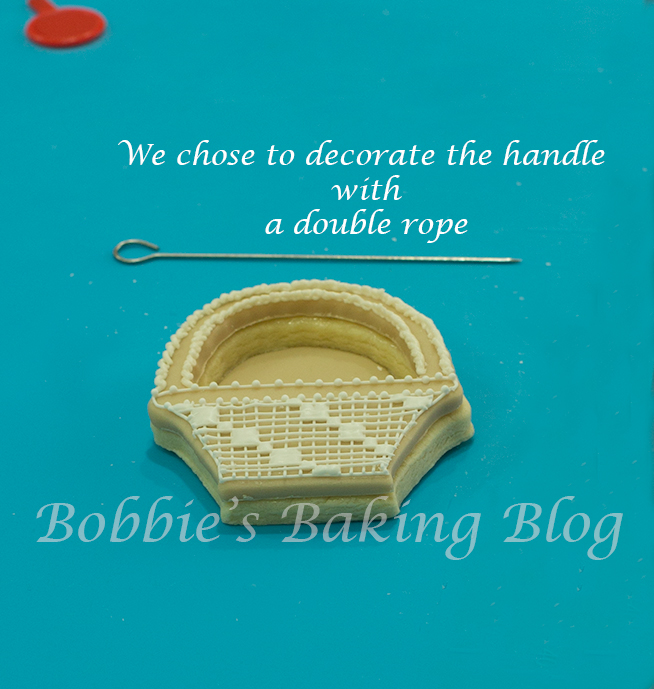
Filling The Basket with Eggs and The Rope Handle:
Prepare your mise en place.
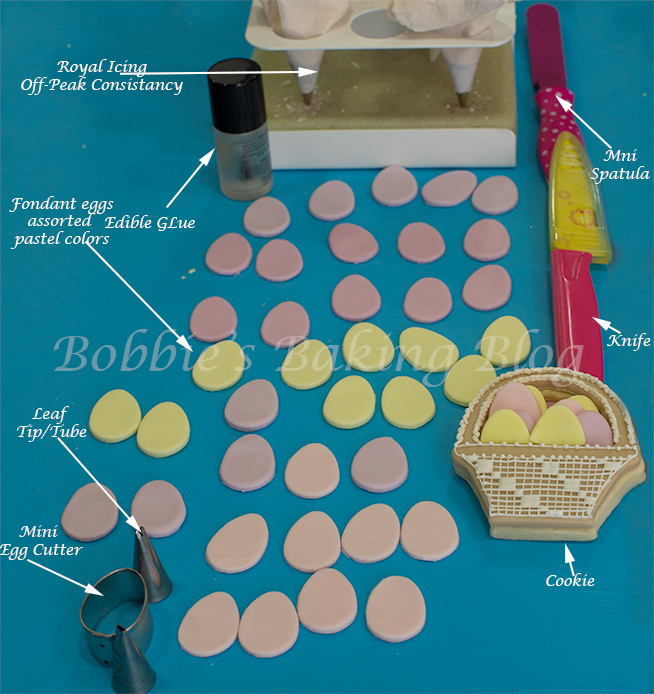
Decorative mise en place
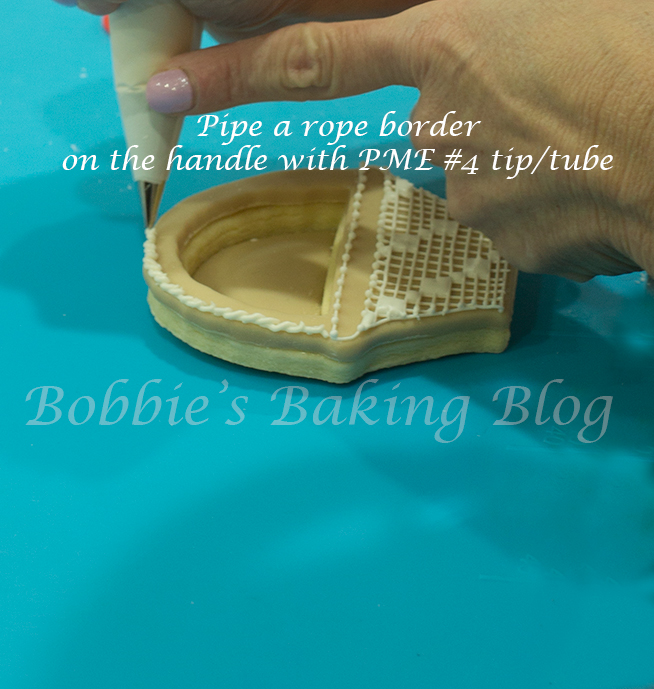
Fit a cone with a PME # 4 tip/tube and fill the basket with an ivory shade, off-peak consistency, royal icing. To achieve ivory add 1/4 drop brown, yellow, and pink food paste fold in with a rubber spatula (that has never been used with fat) until the icing turns ivory and add a 1/4 of a toothpick of piping gel, fold the piping gel until amalgamated. The piping gel will add a shine to the royal icing and allow to pipe longer before drying out.
A rope is just a series of piping of reverse “S” and one “C” shapes to start. Pipe a “S”, holding the cone at a 45 degree angle on the the top and the bottom of the handle. If your “S” shapes are slightly off use a turkey trussing needle to gently move it into shape.
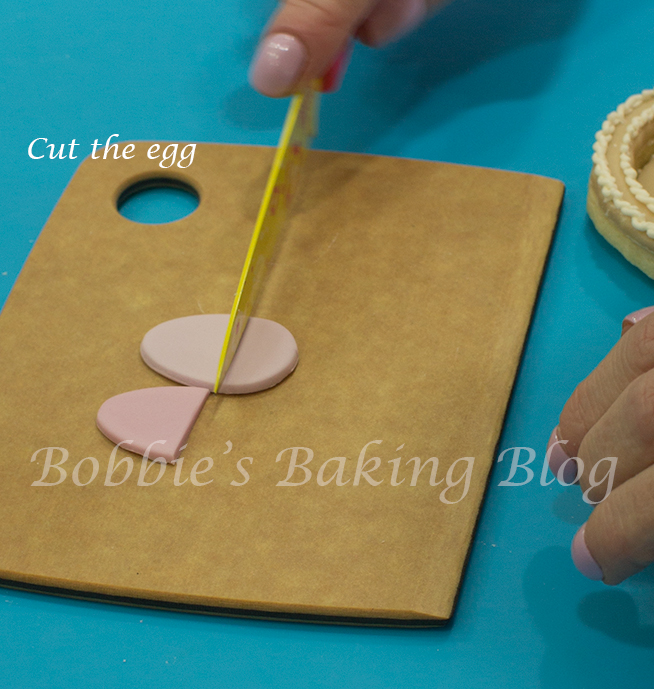
The Eggs:
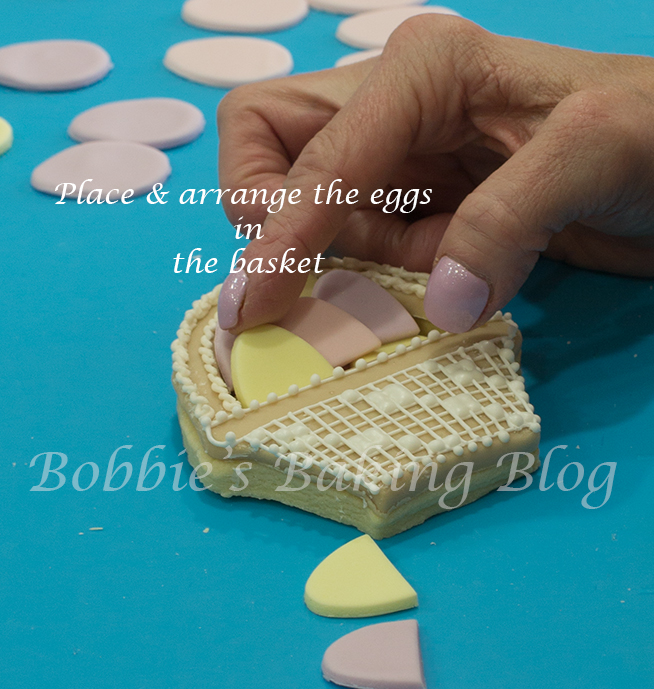
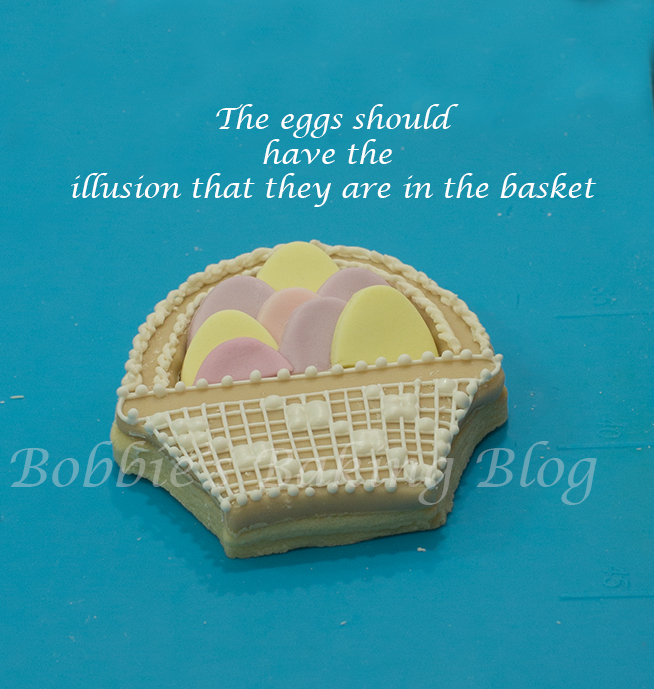
I colored (in pastel yellow, pink, & purple) wrapped, and placed our fondant in plastic bags prior to beginning the project. Knead your colored fondant, roll the fondant, one color at a time, place in a pasta machine to roll out to a number#2 thickness. (If you do not have a pasta machine the fondant maybe rolled by hand). Cut about 18 to 21 eggs of each color, it takes about 12 eggs to fill the basket. Once the fondant is rolled to desired thickness use the mini egg cutter to cut the eggs out. Cut the eggs 2/3 from the top, before glue the eggs down arrange the eggs to your liking, remove them and use edible glue to the back of each egg (work with one egg at a time). Starting under the handle glue each egg down, layering them towards the inside rim of the basket. The idea is for the eggs to give the illusion they are in the basket.

Finishing Touches:
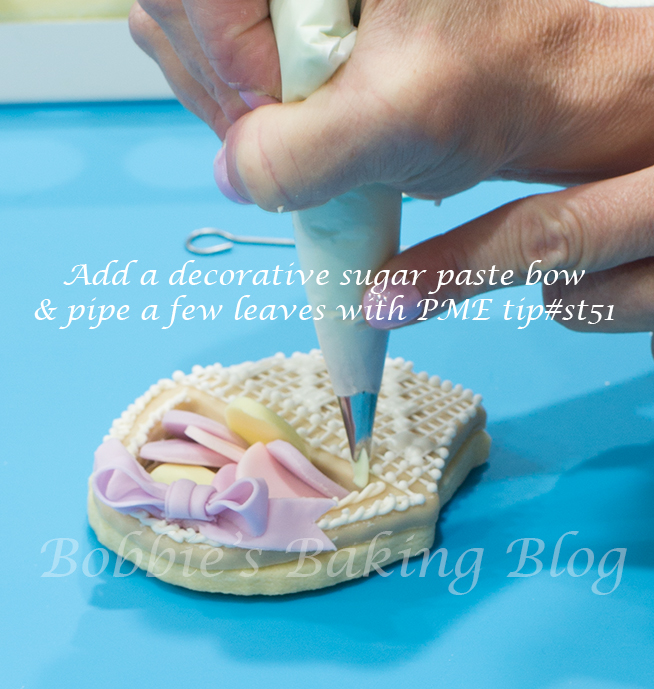
I chose a to create a small fondant bows at the top of each basket handle. I have not included a tutorial on fondant small bows, due to length and techniques of this. I will be posting a small fondant bow tutorial soon.
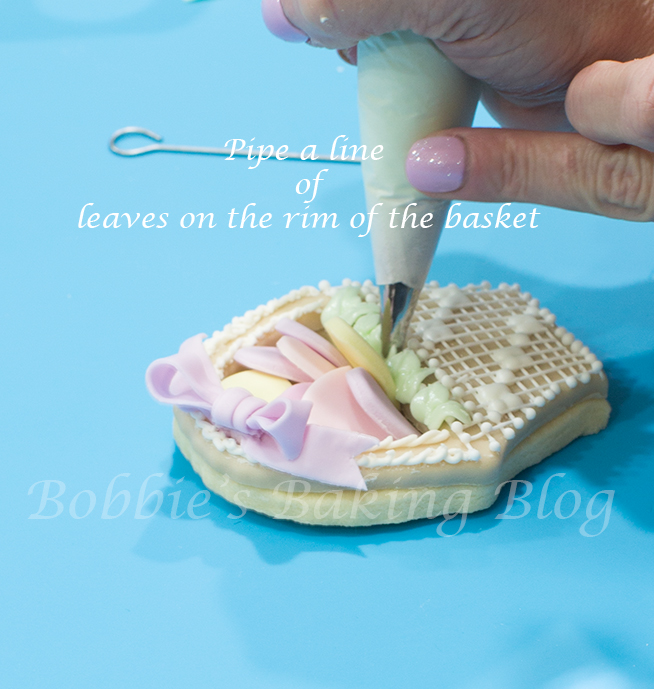
Pipe leaves over laying the rim seemed appropriate and quite easy. Fit a cone with a PME tip st 51 leaf tip, fill the paper cone 1/2 way with off-peak spring green royal icing. To achieve the spring green color add 1/4 of tooth pick electric green food paste and 1/4 of a tooth pick green food paste fold the color until amalgamated, add 1/4th of tooth pick of piping gel fold again. Fold the cone closed. Pipe a leaf on your work station if you can pipe the leaf without squeezing so hard that you have given yourself a hernia, you are good to go.
Holding the tip parallel to the rim of the basket, squeezing firmly, stop pressure when the leaf is triangular, and then decreasing pressure as you draw the tip away from the base to form your first leaf. Continue this process until you reach the opposite end of the rim. To achieve the same size leaves use exact amount of pressure on each leaf.
If you need to move any of the leaves slightly use your turkey trussing needle.
Tips for success:
The royal icing needs to be a soft peak consistency to achieve straight lines that will not break, remember to test the consistency. Be sure you are comfortable prior to piping, in a chair with your back and your feet flat on the floor.
If your find you are becoming frustrated give yourself a 5 minute break.
I would love to see your needle point royal icing work.
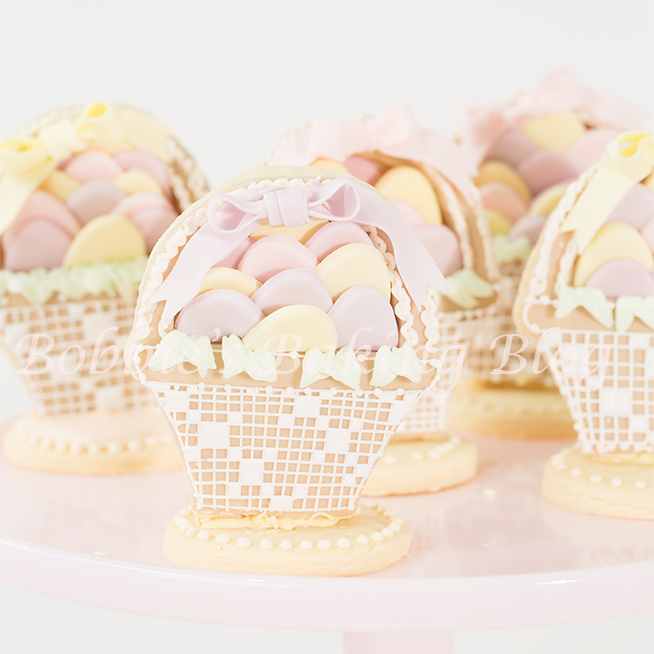
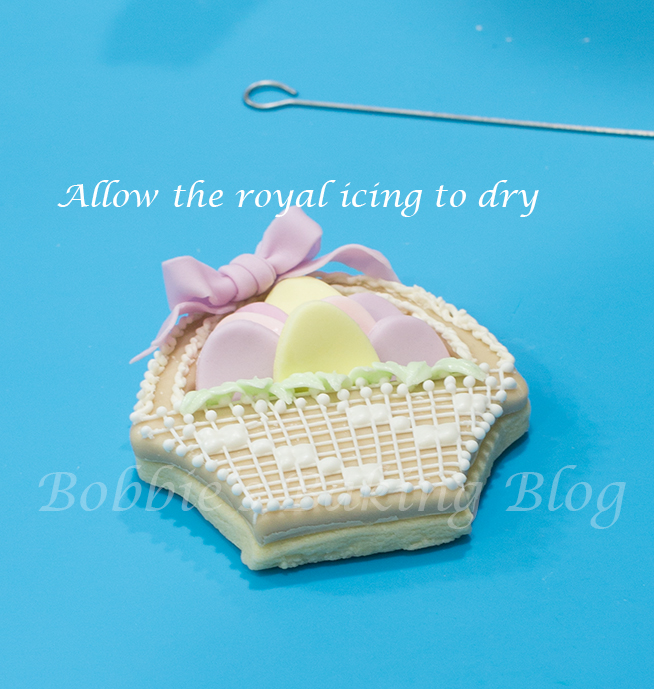
The little sugar cookie baskets are an adorable Easter favor!
Enjoy!

Voila!